JustPaid Reminder Workflows Documentation
Overview
JustPaid’s Automatic Reminders feature enables businesses to manage and track payment reminders efficiently, ensuring timely collections from customers. The system allows for customizable reminder workflows with advanced filtering, automated scheduling, and comprehensive activity tracking.Table of Contents
- Reminder Workflows Overview
- Creating a Reminder Workflow
- Email Configuration
- Filter Conditions
- Reminder Schedules
- Workflow Priority System
- Upcoming Reminders
- Activities & Tracking
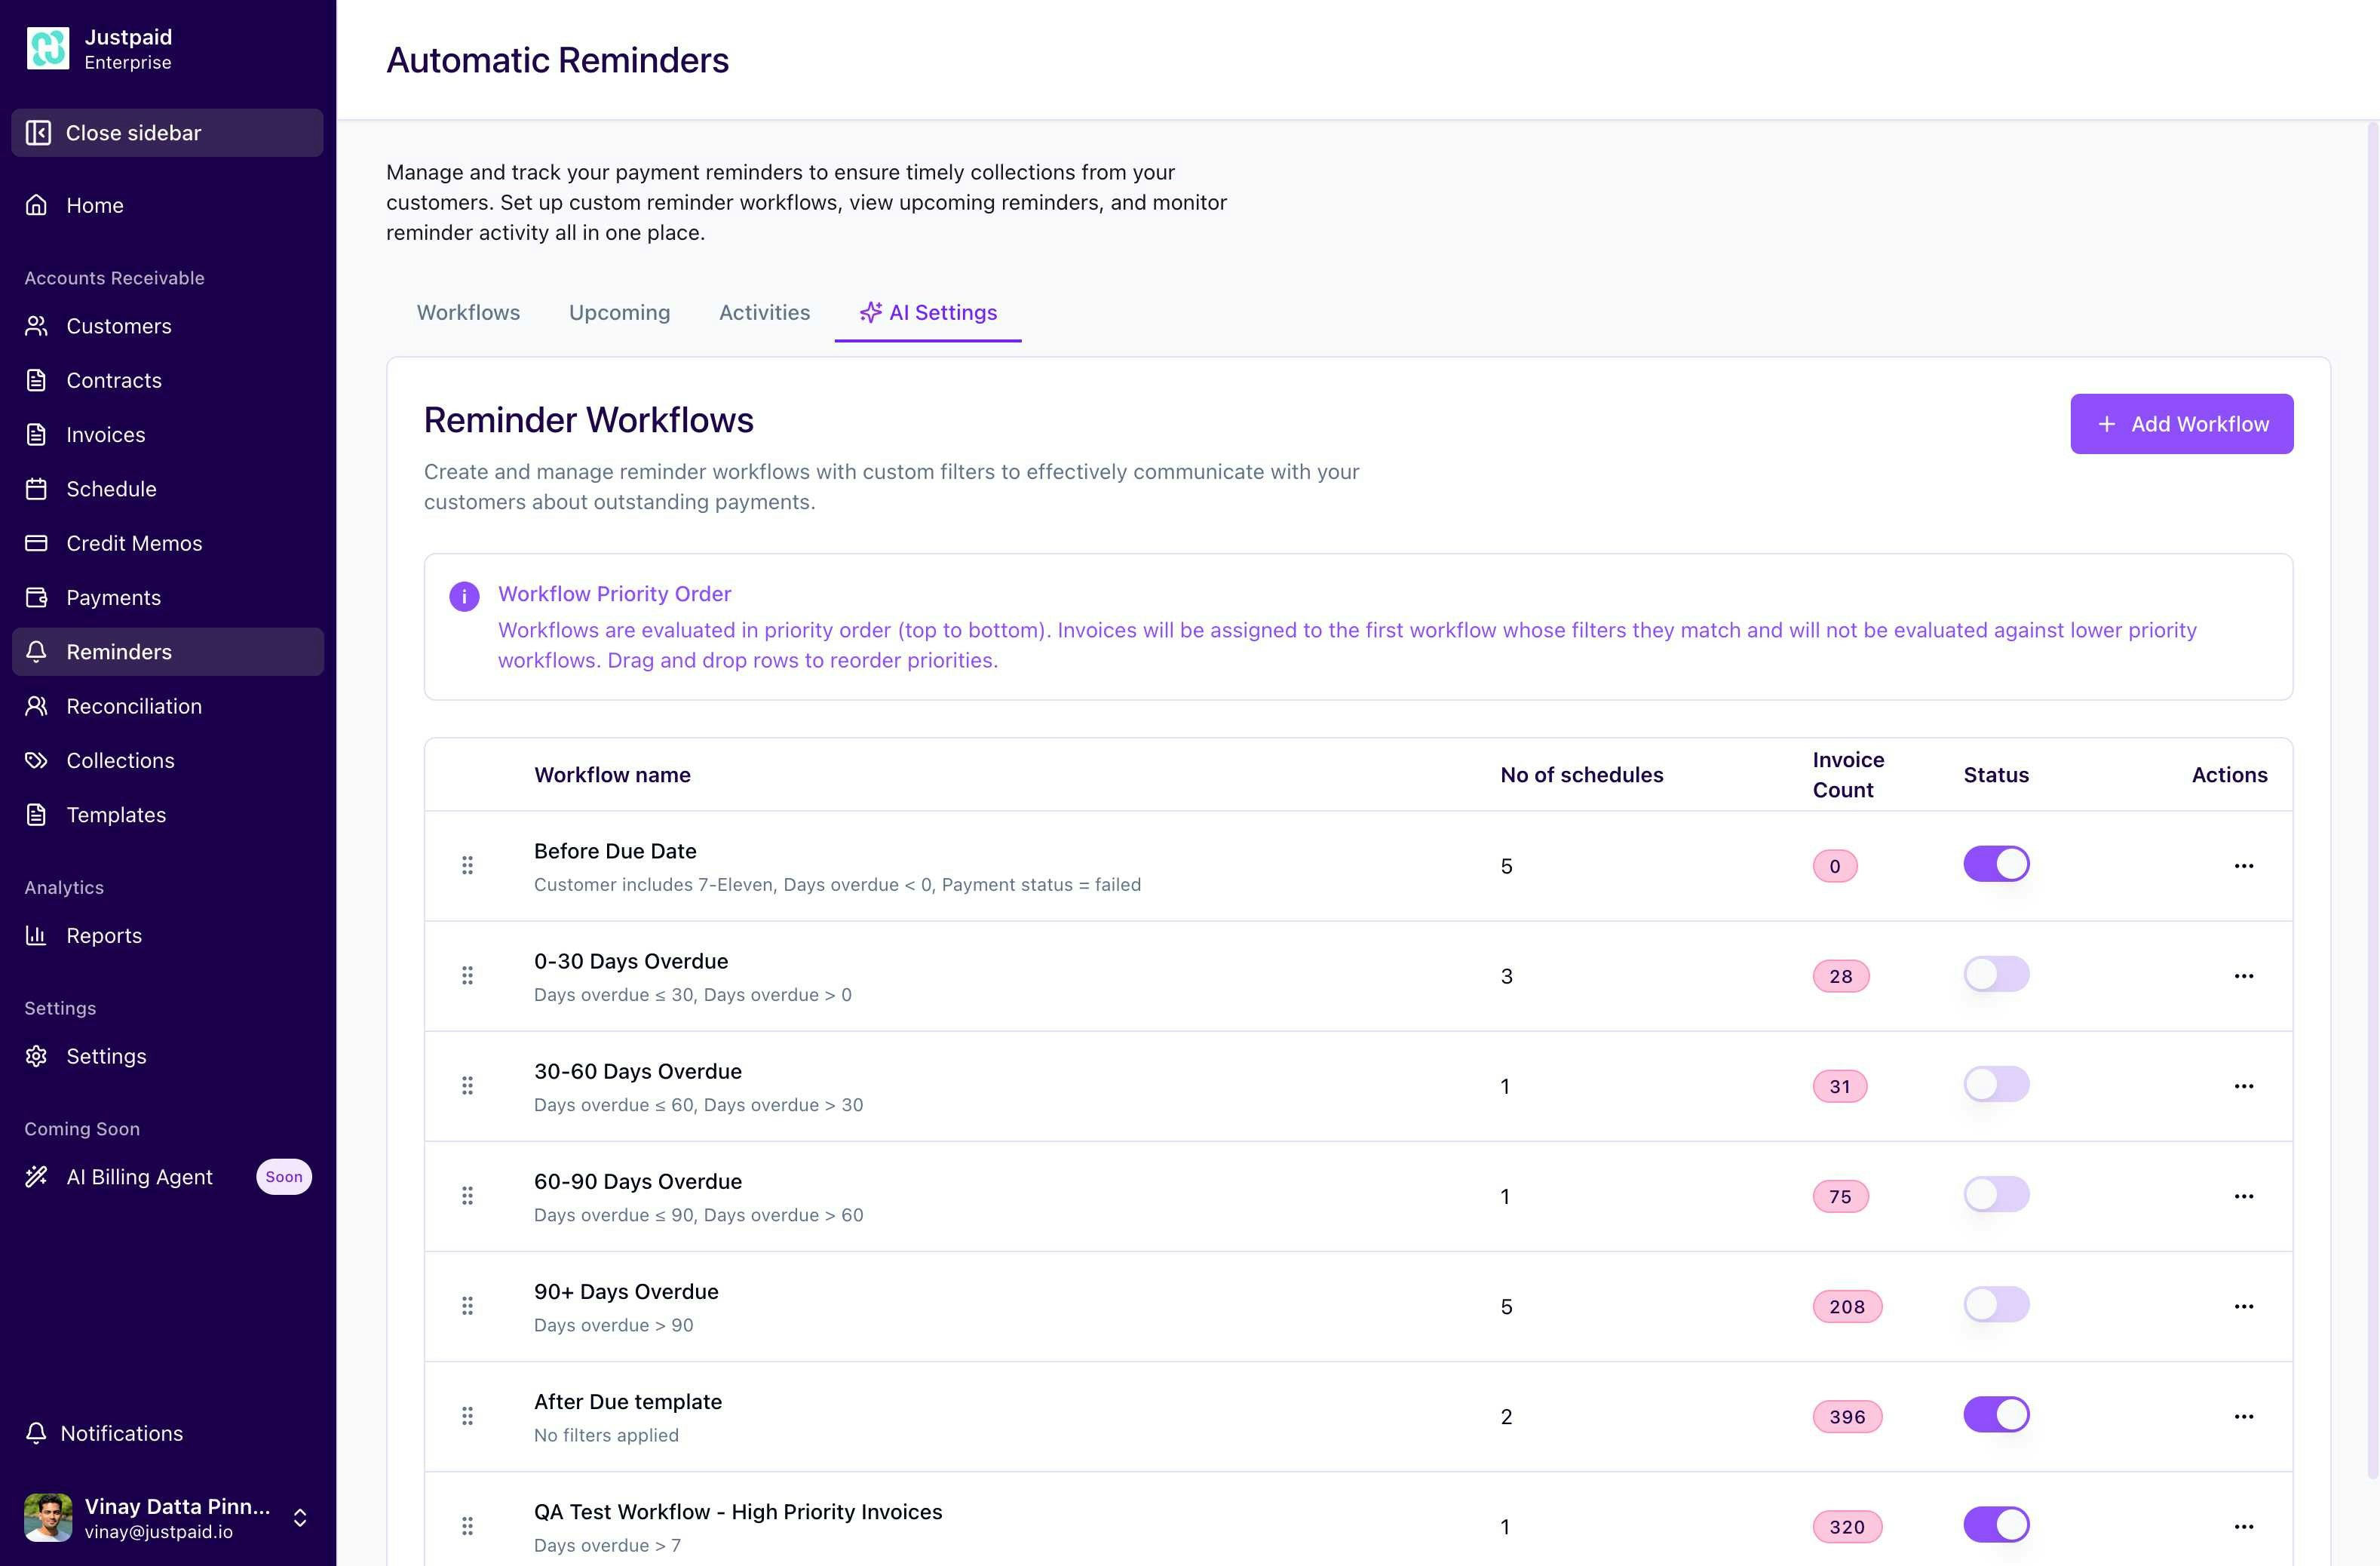
Reminder Workflows Overview
The Reminder Workflows page serves as the central hub for managing all automated payment reminder processes. Here you can:- Create and manage multiple reminder workflows
- Set up custom filters to target specific invoice types
- Configure email settings for professional communication
- Monitor workflow performance and effectiveness
Key Features
- Custom Workflows: Create unlimited reminder workflows tailored to different customer segments
- Smart Filtering: Target specific invoices based on multiple criteria
- Priority-Based Execution: Control which workflows take precedence
- Real-time Monitoring: Track upcoming reminders and email activities
Creating a Reminder Workflow
To create a new reminder workflow, follow these steps:- Navigate to Reminders > Workflows from the sidebar
- Click the “Add Workflow” button in the top right corner
- You’ll be directed to the workflow creation page
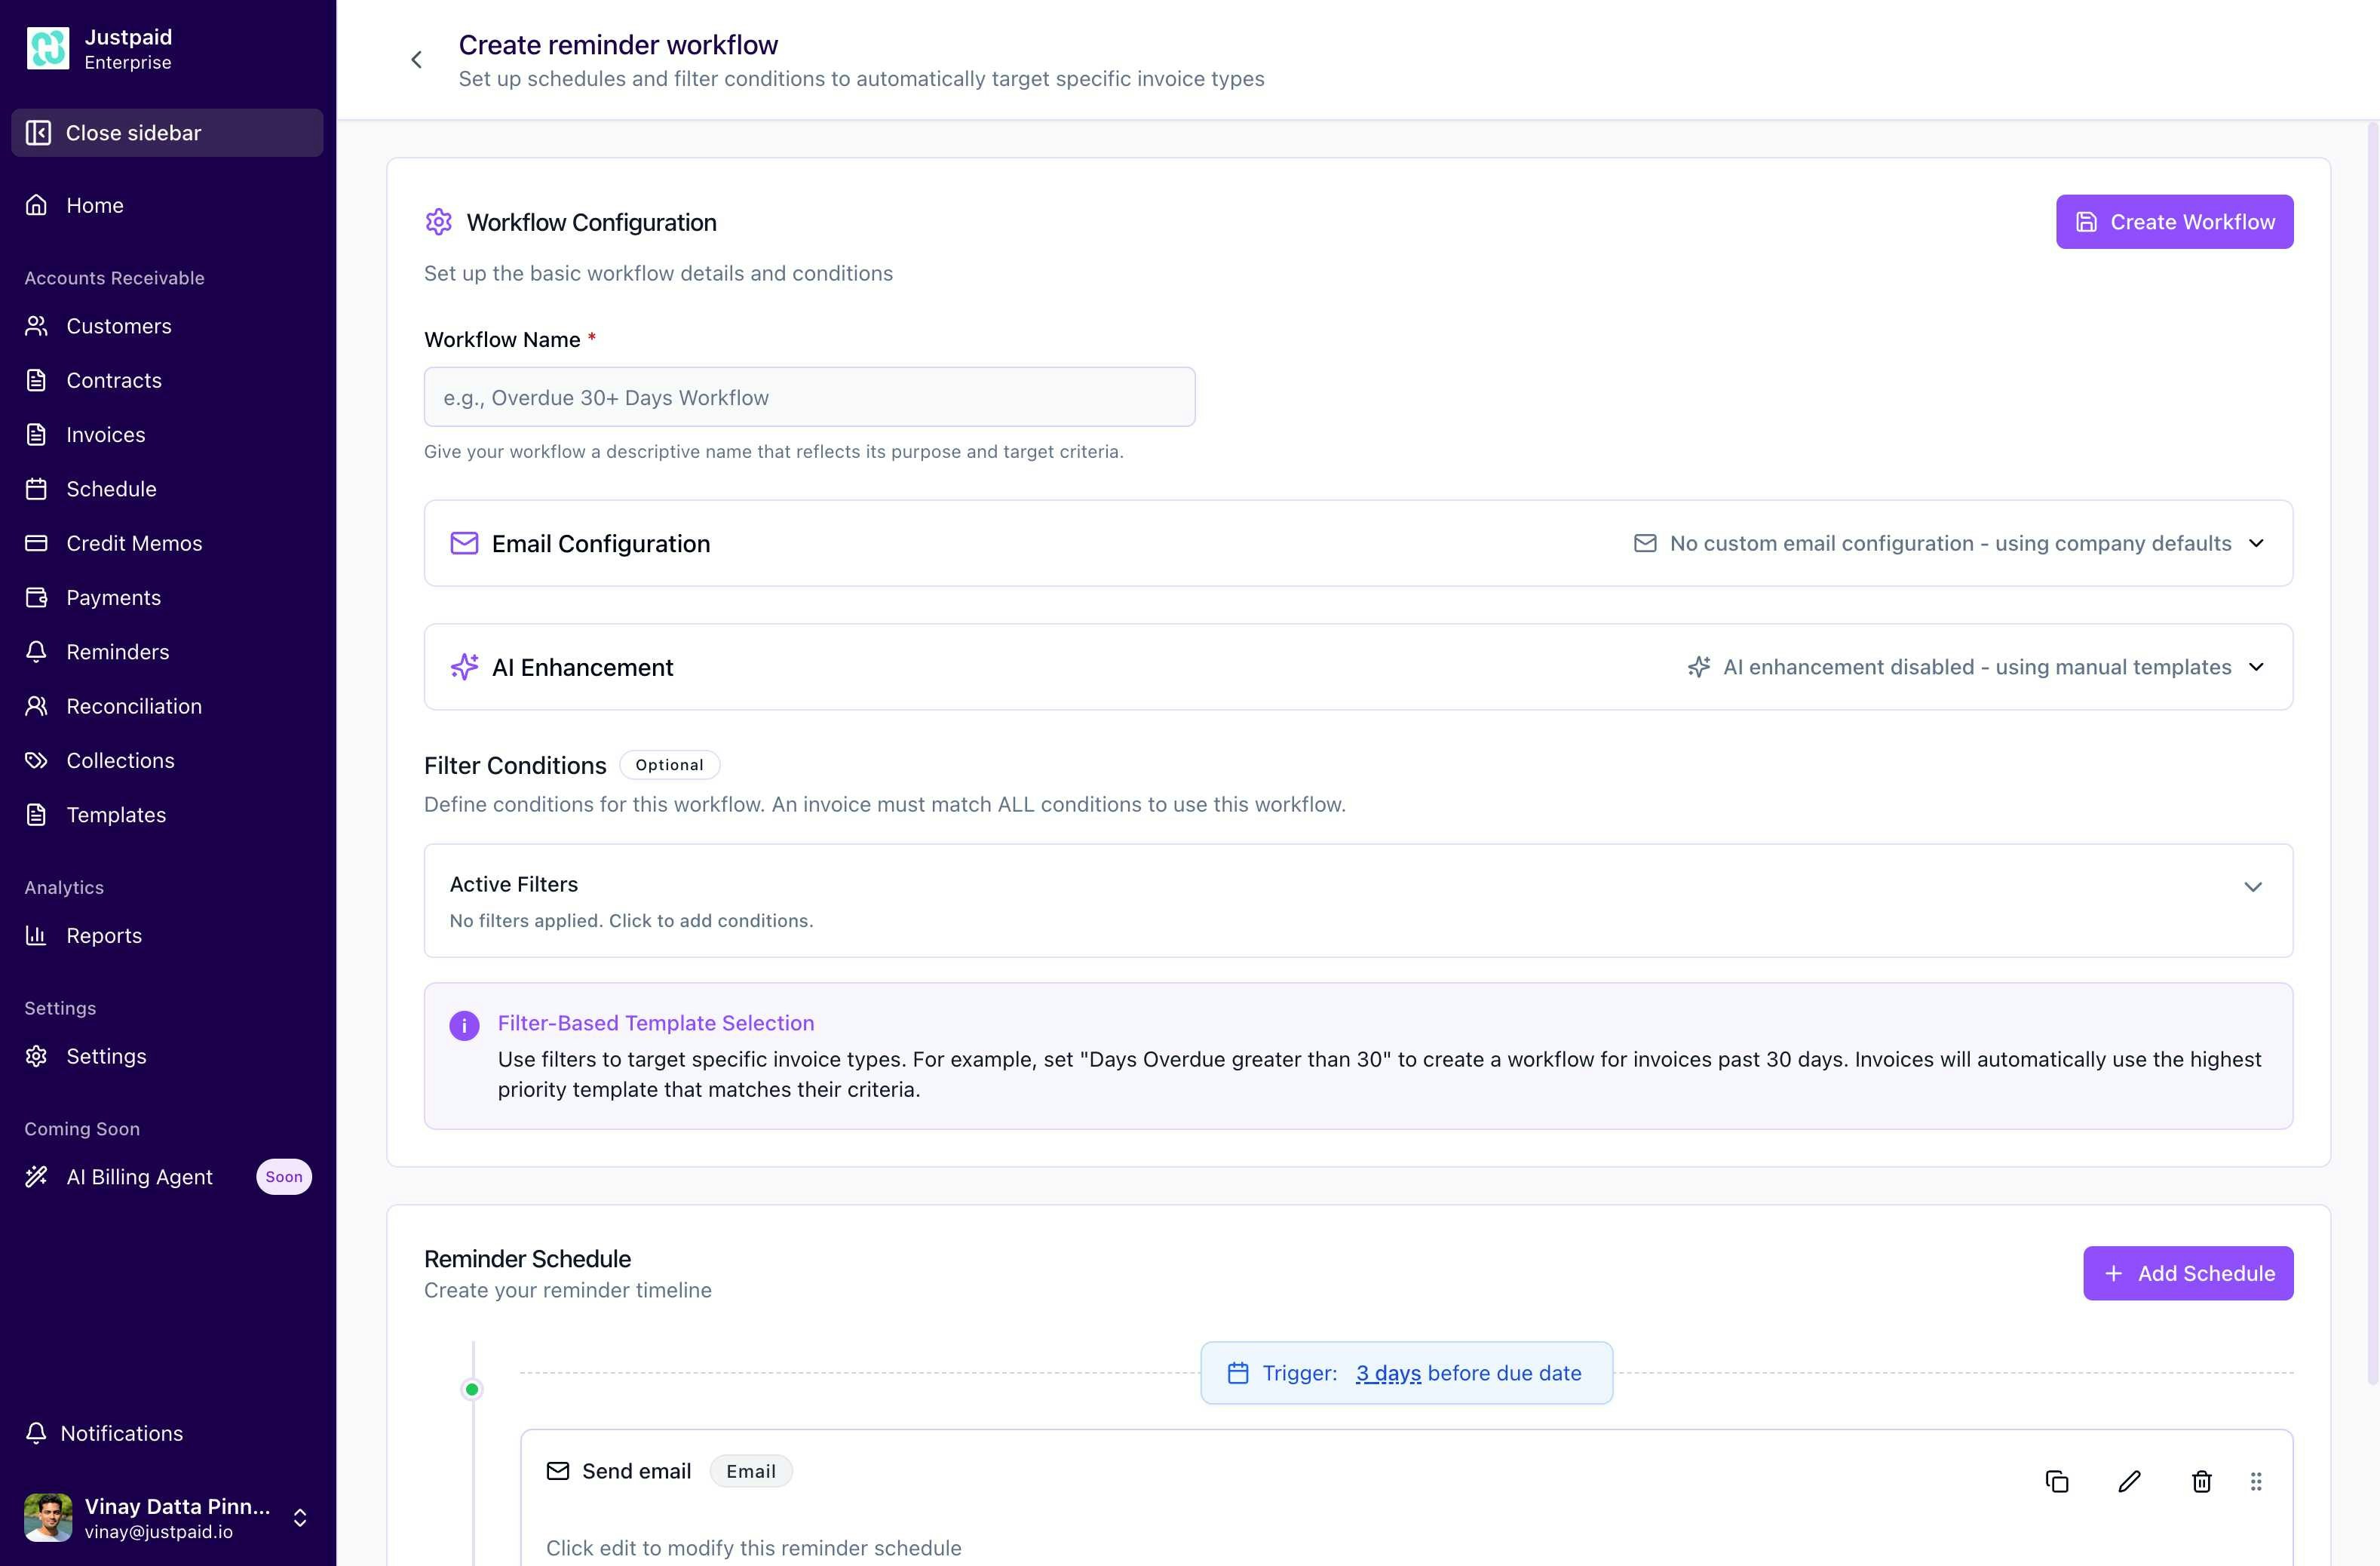
Workflow Configuration Steps
Step 1: Basic Information
Workflow Name (Required)- Enter a descriptive name that reflects the workflow’s purpose
- Examples: “30-Day Overdue Reminders”, “Pre-Due Date Courtesy Notice”
- This name will help you identify the workflow in lists and reports
Step 2: Email Configuration
The email configuration section allows you to customize how reminder emails are sent: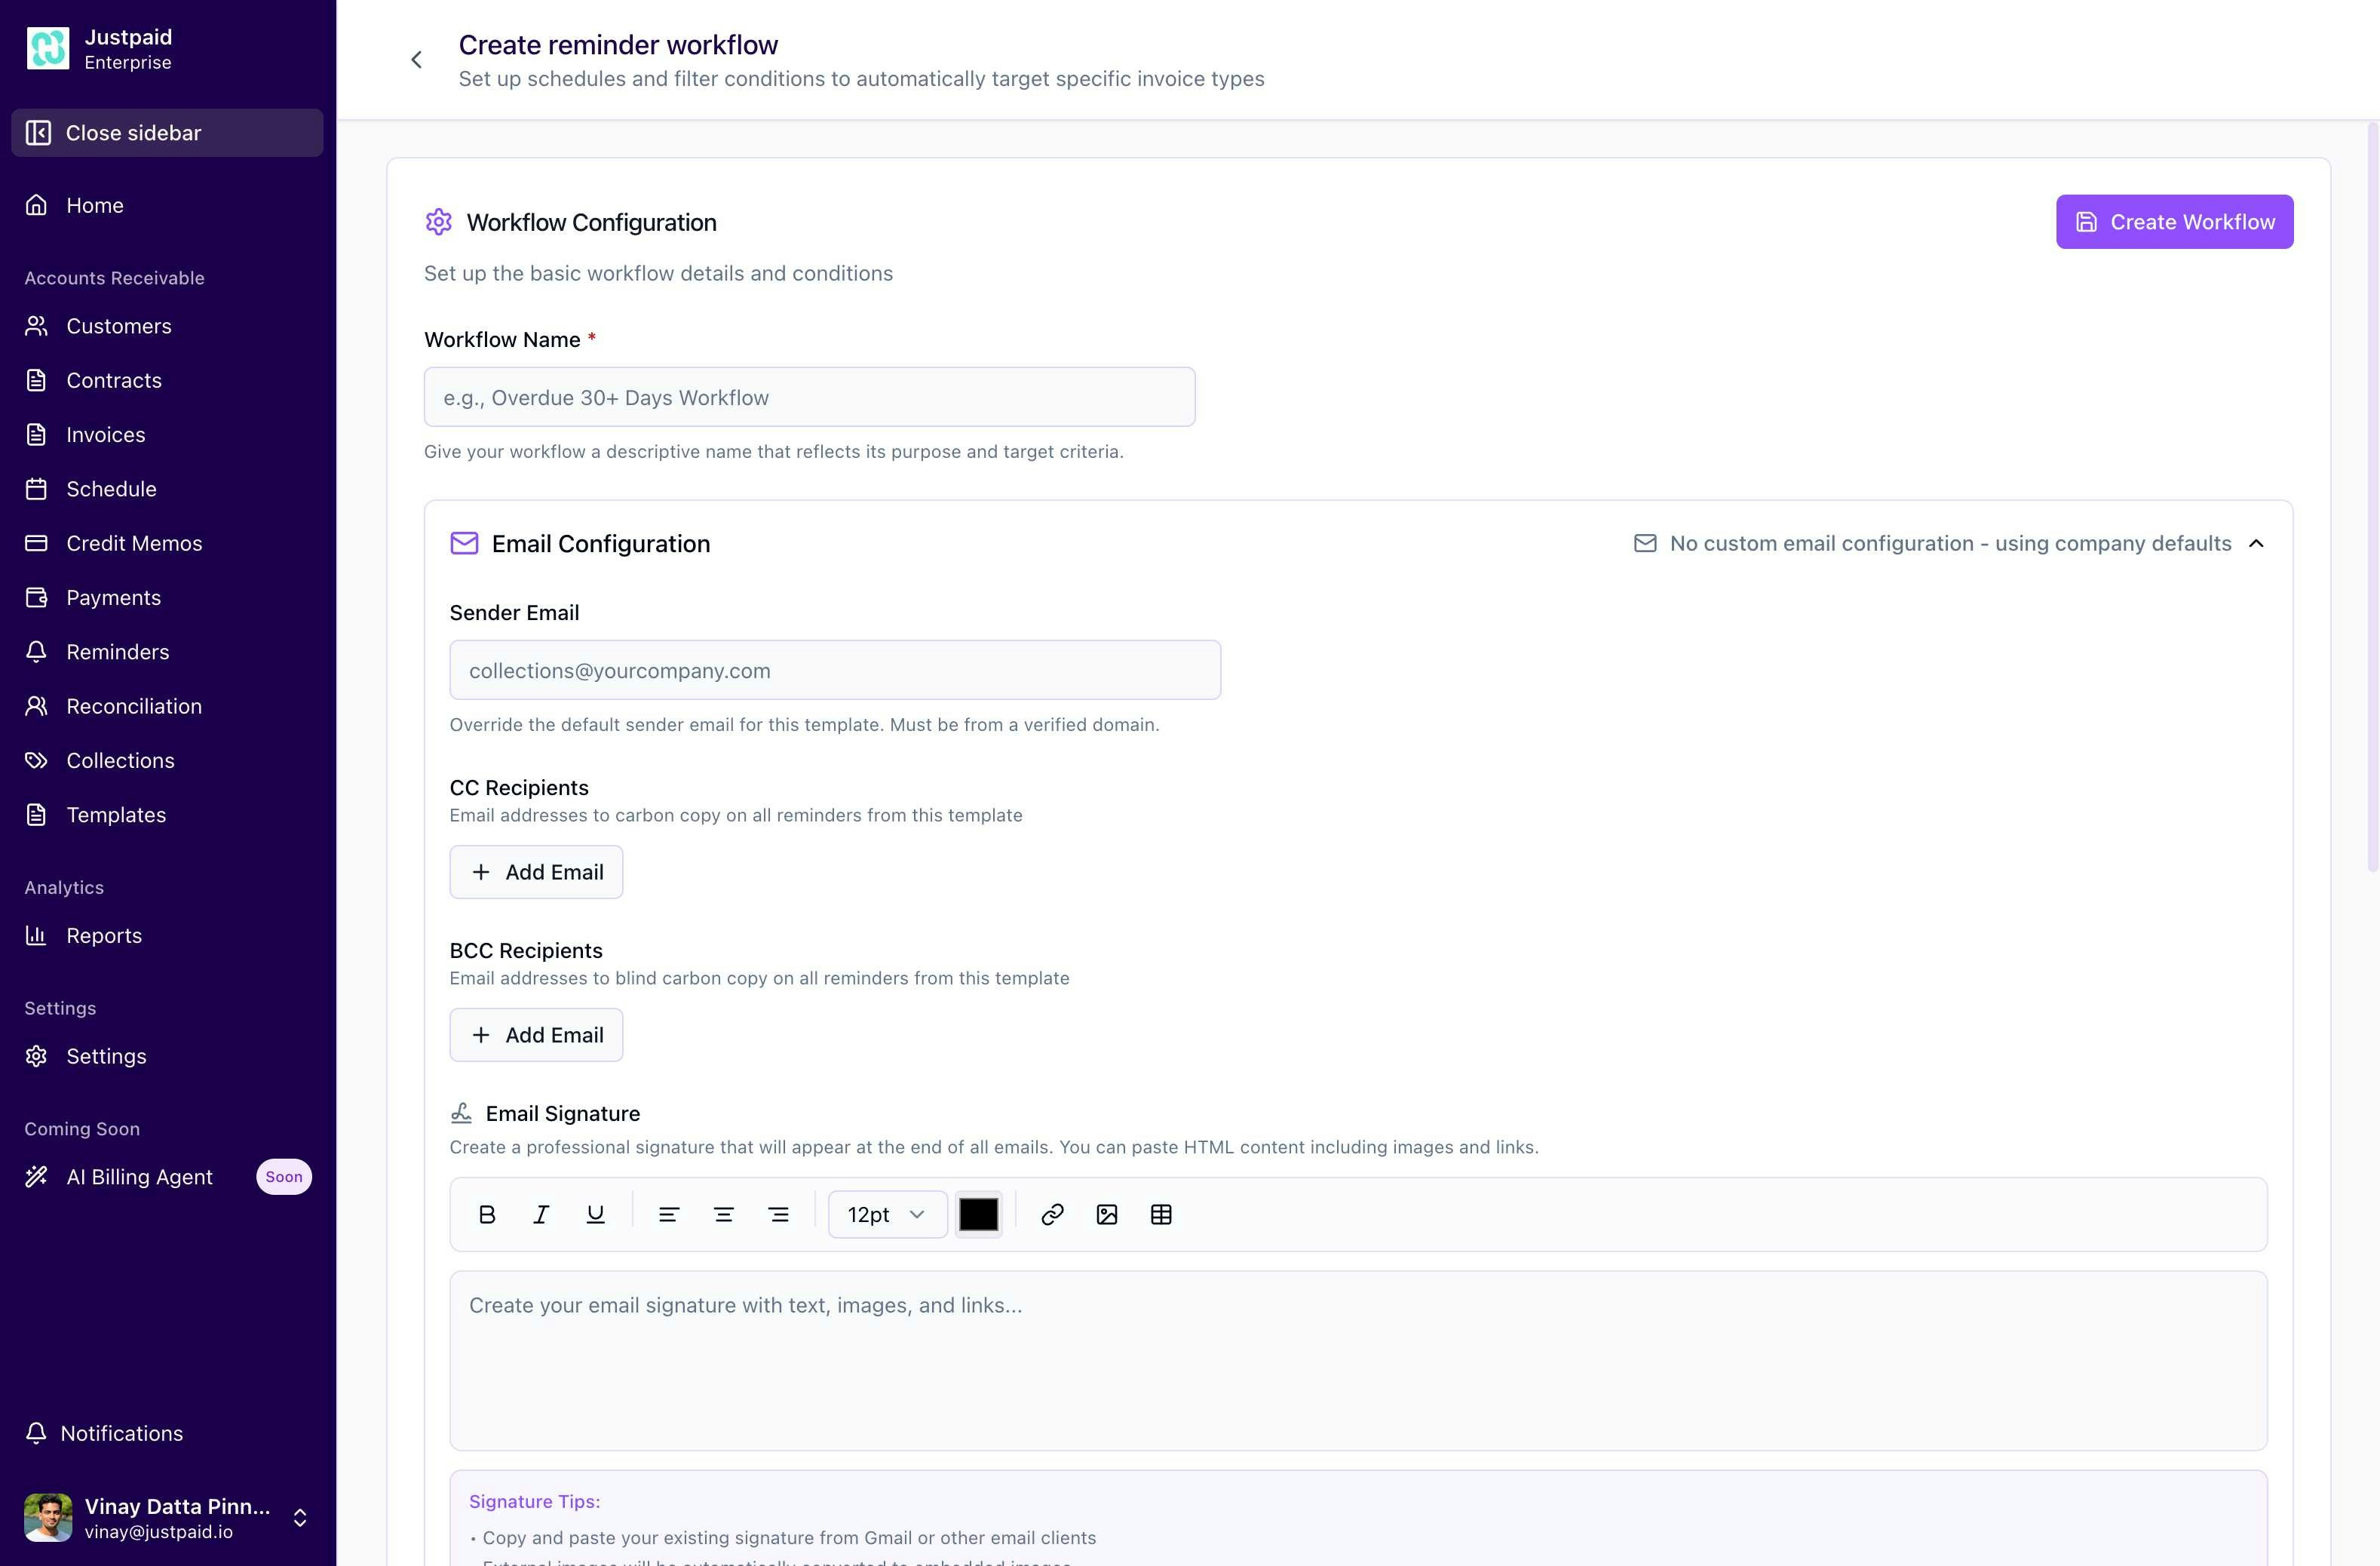
-
Sender Email
- Override the default company sender email
- Must be from a verified domain
- Leave blank to use company defaults
-
CC Recipients
- Add email addresses to carbon copy on all reminders
- Useful for keeping account managers or supervisors informed
- Click “Add Email” to include multiple recipients
-
BCC Recipients
- Add email addresses for blind carbon copy
- Perfect for internal tracking without customer visibility
- Click “Add Email” to include multiple recipients
-
Email Signature
- Create a professional signature for all reminder emails
- Full HTML editor with formatting options:
- Bold, Italic, Underline text
- Numbered and bulleted lists
- Links and images
- Font size and color customization Signature Tips:
- Copy and paste existing signatures from Gmail or other email clients
- External images are automatically converted to embedded images
- Upload images directly using the image button for best results
- Include links to your website, social media, or contact information
- Keep it professional and concise for the best impression
Step 3: AI Enhancement (Optional)
- Enable AI-powered email personalization
- Currently shows “AI enhancement disabled - using manual templates”
- When enabled, AI can customize email content based on customer history and context
Filter Conditions
Filter conditions determine which invoices will receive reminders through this workflow. An invoice must match ALL conditions to use the workflow.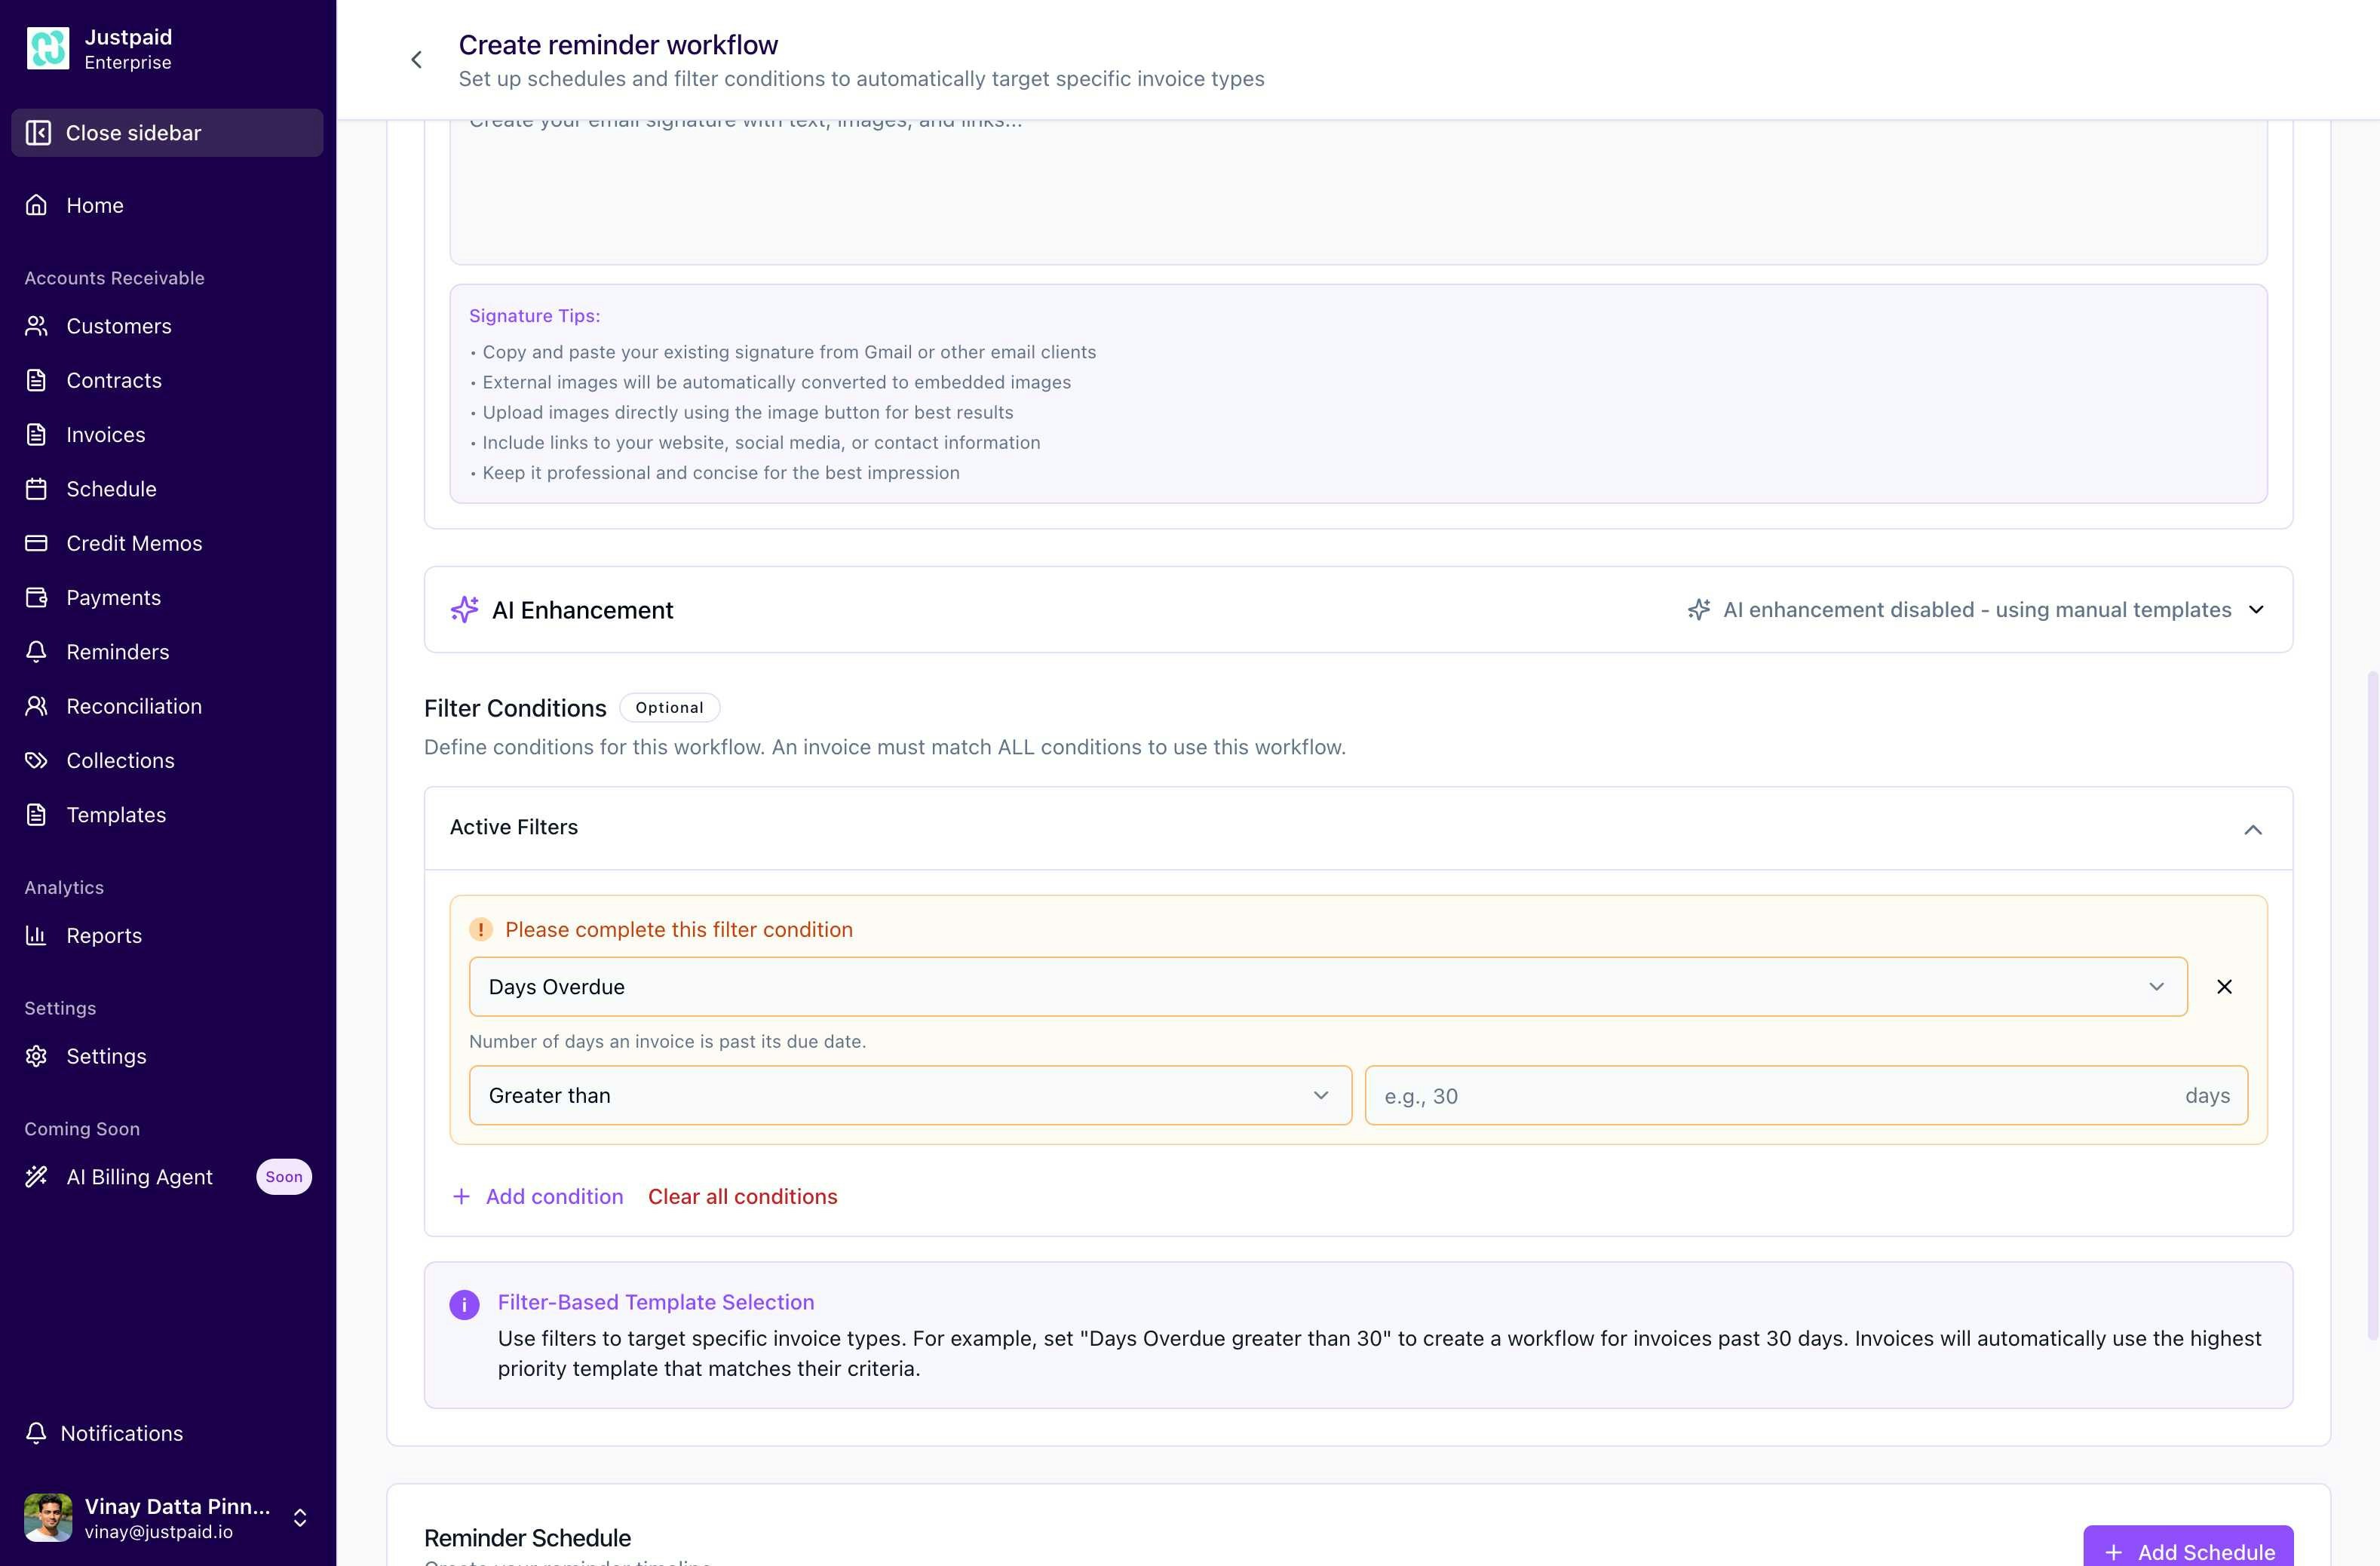
Available Filter Fields
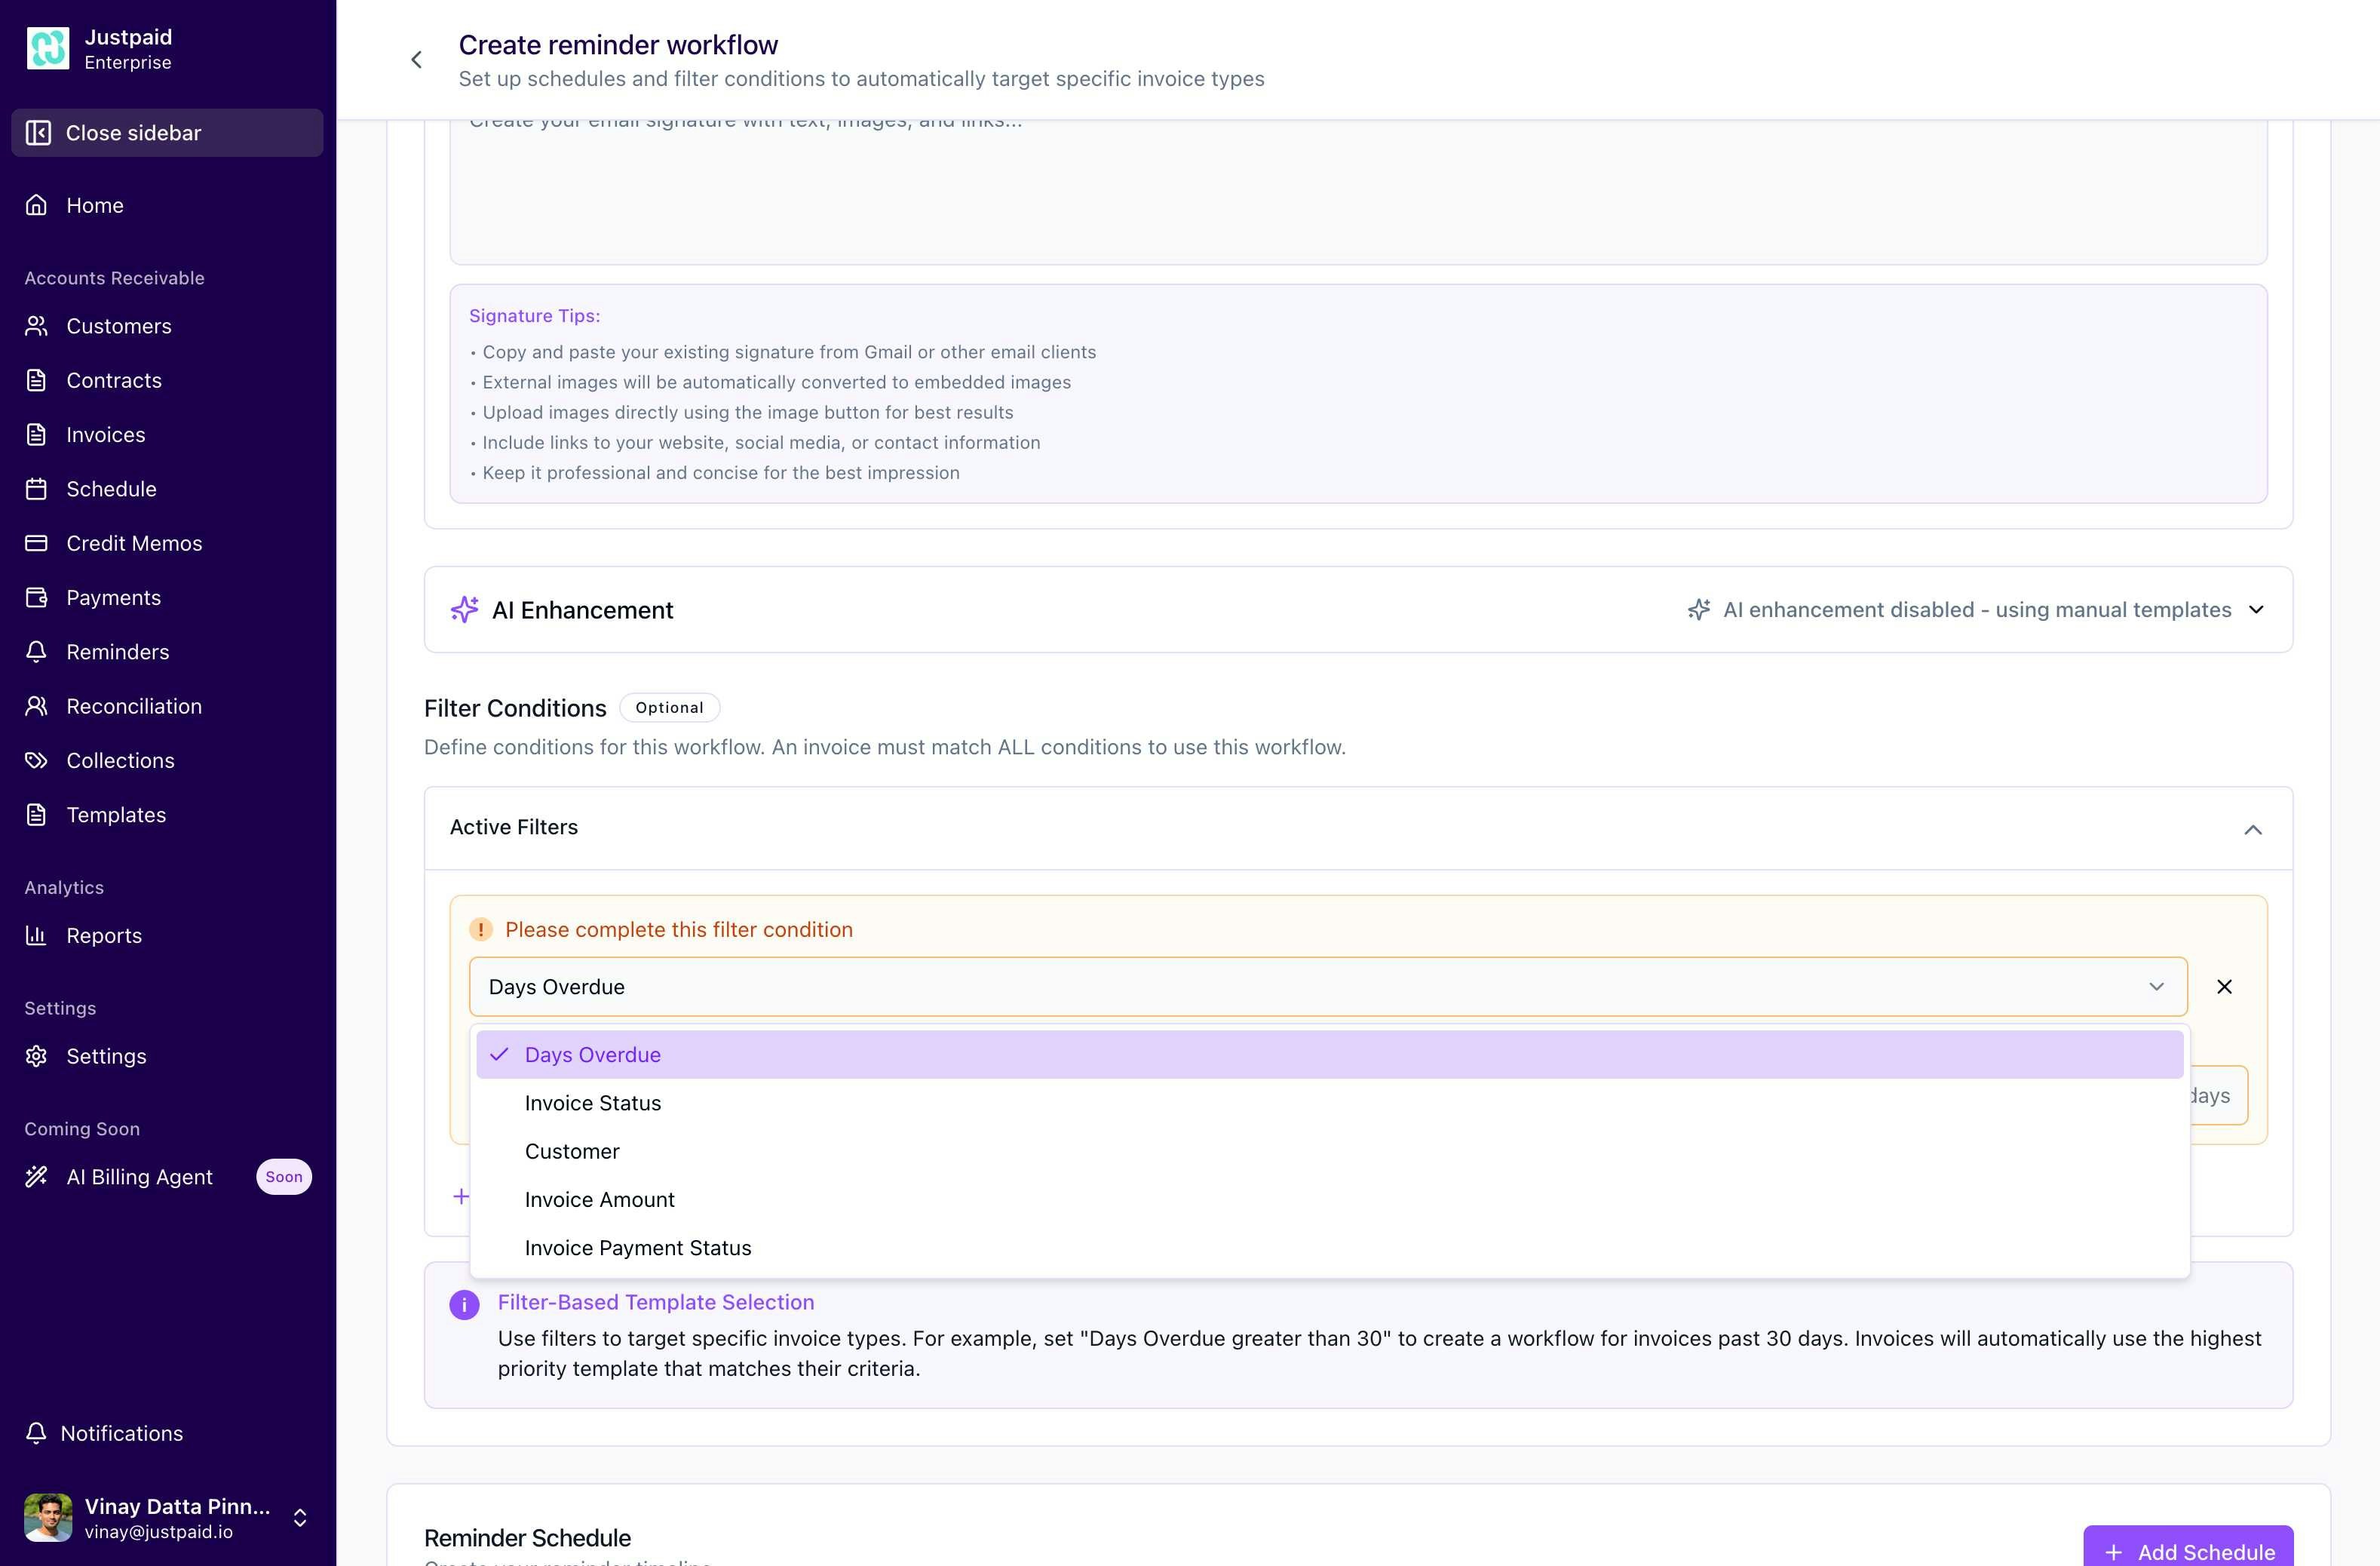
-
Days Overdue
- Filter by the number of days past due date
- Operators: Greater than, Less than, Equals, Between
- Example: “Days overdue > 30” for invoices 30+ days past due
-
Invoice Status
- Filter by current invoice status
- Options: Draft, Sent, Paid, Overdue, Void
- Useful for targeting specific invoice states
-
Customer
- Filter by specific customers or customer groups
- Select from dropdown or search by name
- Can include or exclude specific customers
-
Invoice Amount
- Filter by invoice total amount
- Set minimum/maximum thresholds
- Example: Target high-value invoices over $10,000
-
Invoice Payment Status
- Filter by payment processing status
- Options: Pending, Failed, Successful, Not Attempted
- Useful for retry scenarios after failed payments
Filter Logic
- Multiple conditions use AND logic (all must be true)
- Click “Add condition” to include additional filters
- Use “Clear all conditions” to reset filters
- No filters means the workflow applies to all invoices (based on priority)
Best Practices
- Start with broad filters and refine based on results
- Test workflows with a small customer segment first
- Document filter logic for team understanding
- Review filter effectiveness regularly
Reminder Schedules
Reminder schedules are the core components of a workflow that define when and how reminders are sent to customers. Each schedule represents a specific touchpoint in your collection process.Schedule Overview
Default Schedule View
- Trigger timing: Shows when the reminder will be sent (e.g., “3 days before due date”)
- Action type: Currently supports “Send email” with plans for SMS and other channels
- Quick actions: Copy, Edit, and Delete buttons for schedule management
Visual UI Components
Schedule Card Elements
- Calendar Icon: Visual indicator for timing-based actions
- Trigger Label: Blue badge showing the exact timing (e.g., “3 days before due date”)
- Action Card: Expandable section showing “Send email” with email icon
- Action Buttons: Three icons on the right for Copy, Edit, and Delete operations
- Expand/Collapse: Click anywhere on the card to expand and see the quick preview
Expanded Edit View

- Tab Navigation: Edit and Preview tabs for switching between configuration and visualization
- Action Buttons: “Update Variables” and “Enhance with AI” for advanced features
- Rich Text Toolbar: Full formatting options for professional email creation
- Variable Pills: Clickable tags for easy insertion of dynamic content
- Save/Cancel Actions: Clear action buttons at the bottom of the form
Creating a Schedule
- Click “Add Schedule” in the Reminder Schedule section
- A default schedule is automatically created with “3 days before due date” timing
- Click the Edit button (pencil icon) to customize the schedule
Schedule Configuration Interface
When you click the Edit button on any schedule, you’ll see the comprehensive configuration interface:1. Communication Medium
Currently supports:- Email: Primary communication channel for reminder delivery
- Future channels: SMS, In-app notifications (coming soon)
2. Timing Configuration
The timing configuration determines when your reminder will be sent relative to the invoice due date: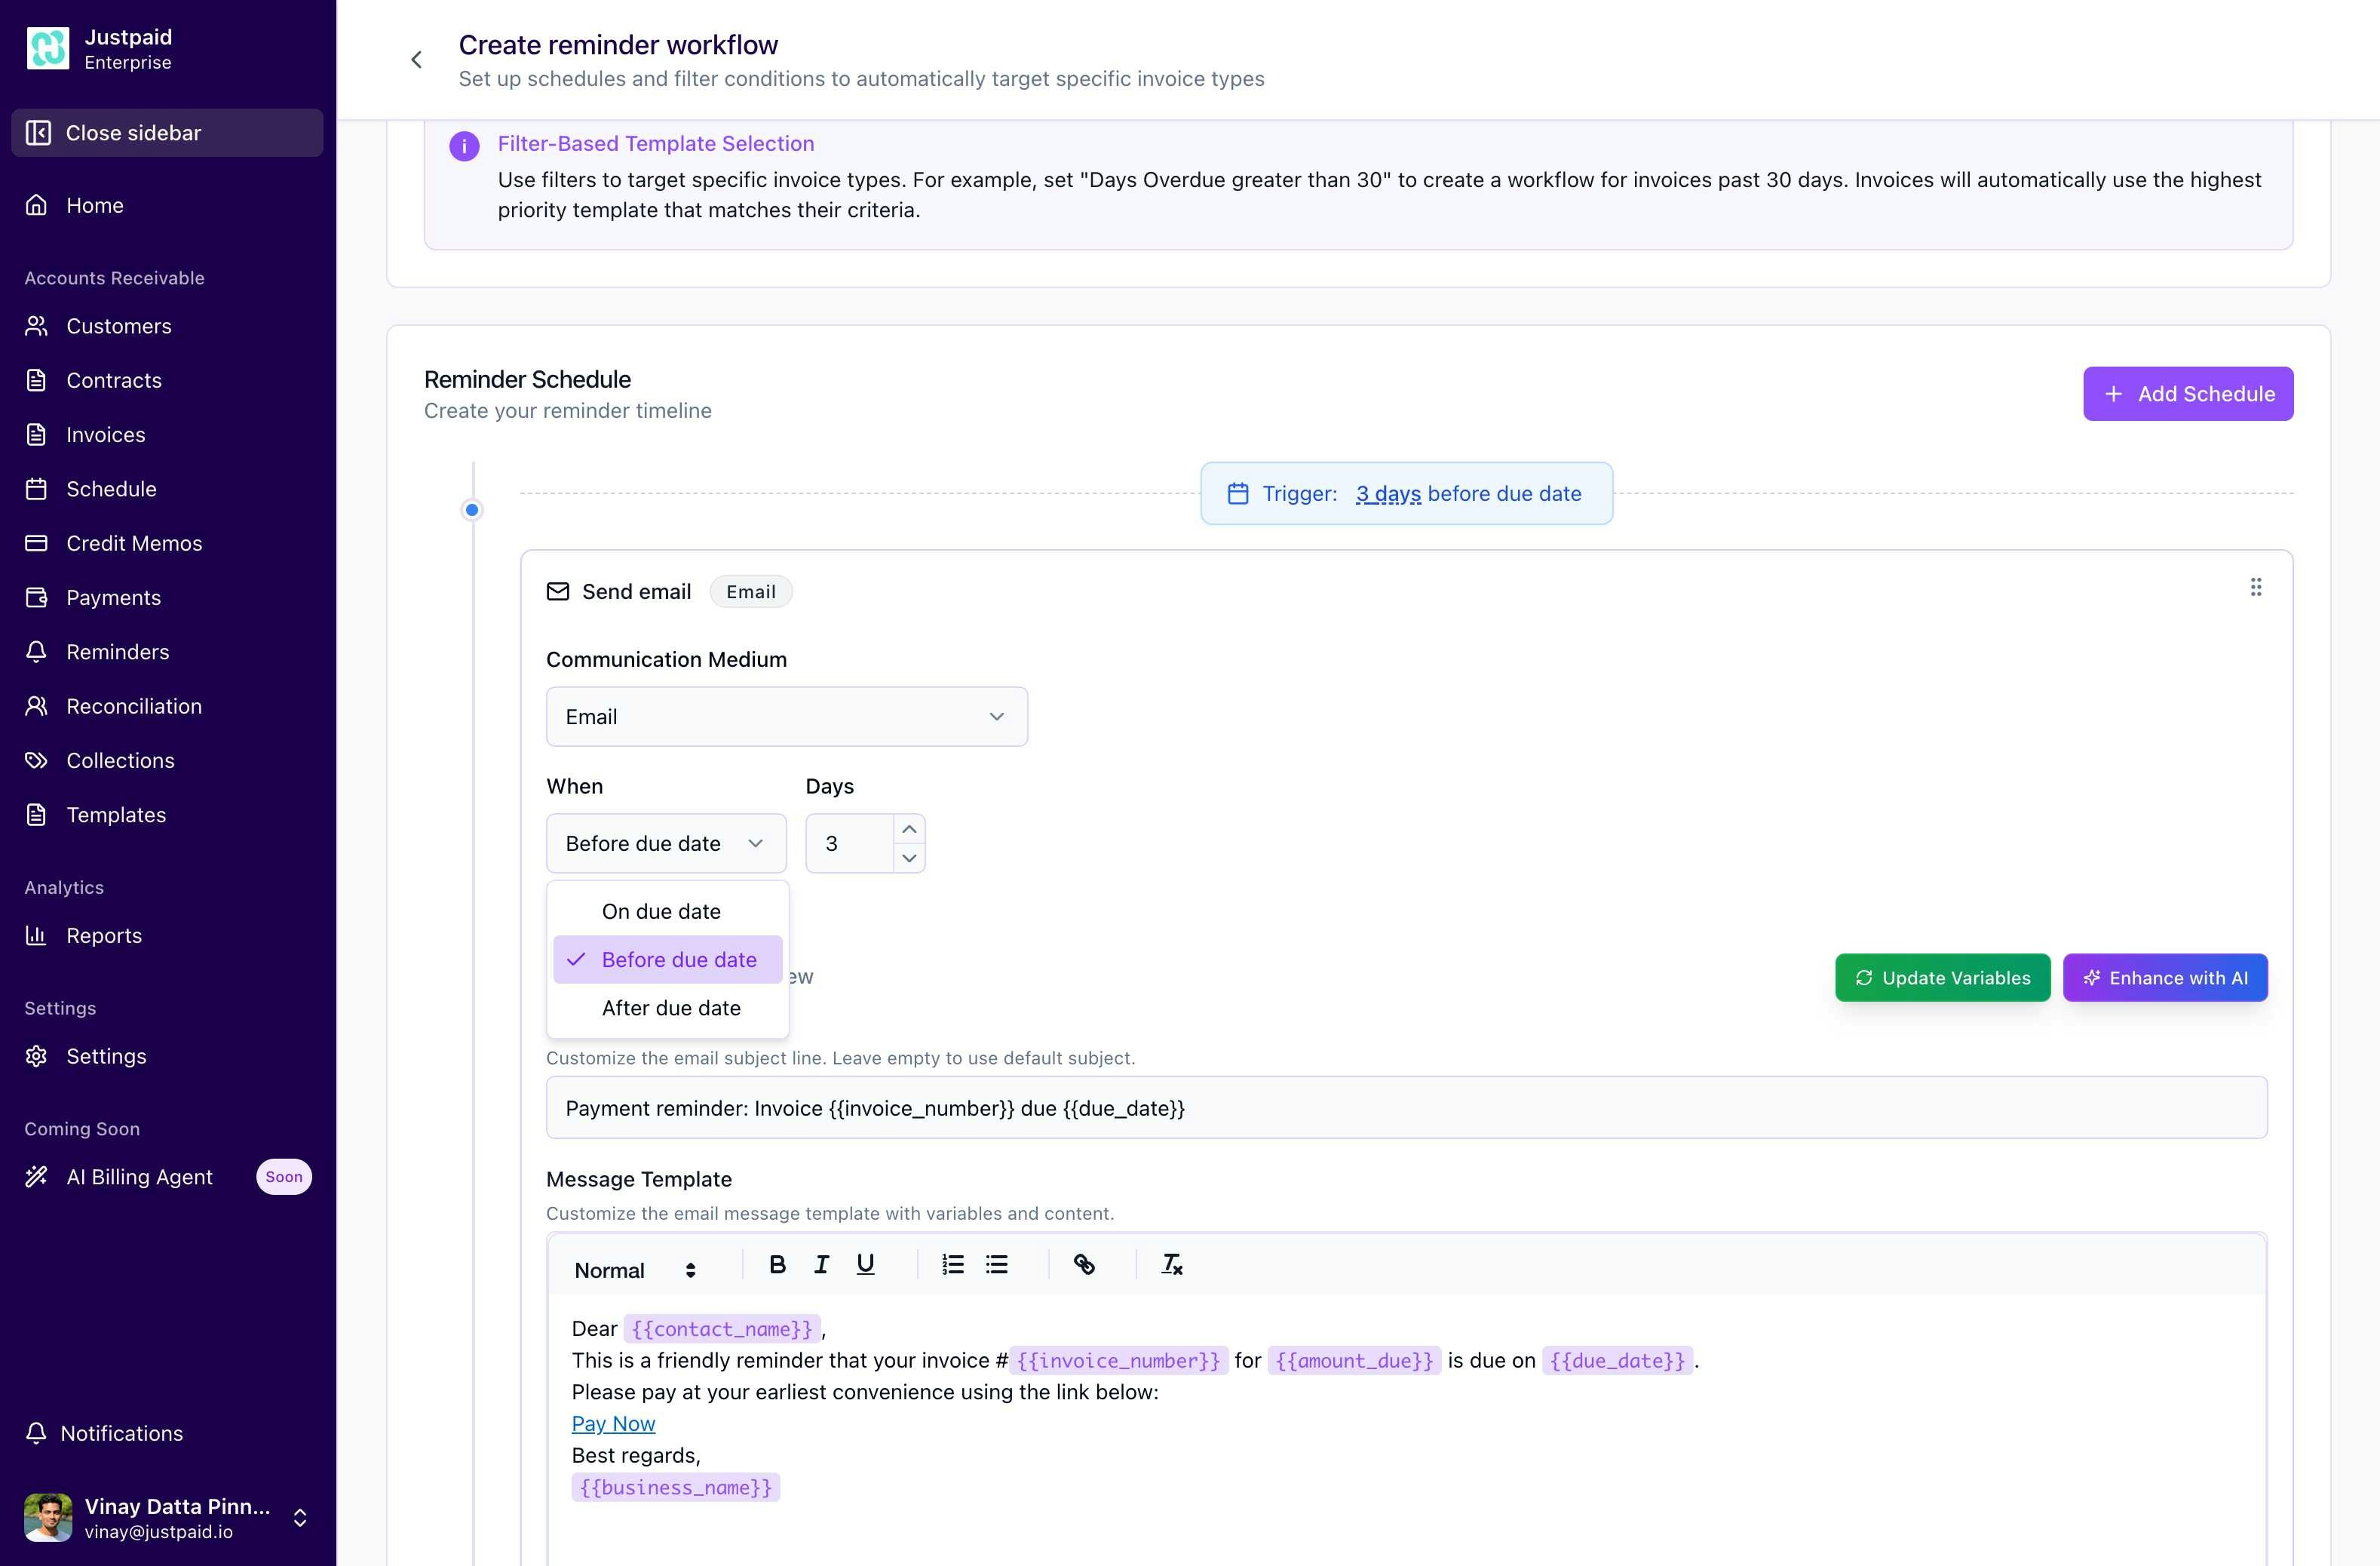
- Before Due Date: Proactive reminders sent X days before the invoice is due
- Configurable days: 1-30 days before
- Ideal for courtesy notices and payment preparation
- On Due Date: Reminder sent on the exact due date
- No day configuration needed
- Perfect for same-day payment reminders
- After Due Date: Follow-up reminders for overdue invoices
- Configurable days: 1-365 days after
- Essential for collections and escalation
- Numeric input with increment/decrement buttons
- Automatically disabled for “On due date” option
- Validates reasonable ranges (e.g., max 365 days)
3. Message Template Editor
Edit Tab Features: Subject Line Template:- Customizable email subject with variable support
- Default:
Payment reminder: Invoice {{invoice_number}} due {{due_date}} - Leave empty to use system default subject
- Rich text editor with formatting options:
- Text styles: Normal, Heading 1, Heading 2
- Formatting: Bold, Italic, Underline
- Lists: Numbered and Bulleted
- Links: Add payment links and URLs
- Text alignment options
{{customer_name}}- Company name{{contact_name}}- Primary contact name{{customer_email}}- Customer email address{{invoice_number}}- Invoice identifier{{amount_due}}- Outstanding amount{{due_date}}- Payment due date{{invoice_date}}- Original invoice date{{days_overdue}}- Days past due (for overdue reminders){{business_name}}- Your company name{{business_email}}- Your company email{{payment_link}}- Direct payment URL{{payment_method_last_4}}- Last 4 digits of saved card{{payment_method_brand}}- Card brand (Visa, Mastercard, etc.){{payment_method_type}}- Payment method type{{has_saved_payment_method}}- Boolean for conditional logic
- Update Variables: Refreshes available variables based on your account settings
- Enhance with AI: Uses AI to improve and professionalize your message template
- Auto-attachment: Invoice PDF is automatically attached to all reminder emails
4. Preview Tab
The Preview tab provides a real-time visualization of how your reminder email will appear to recipients: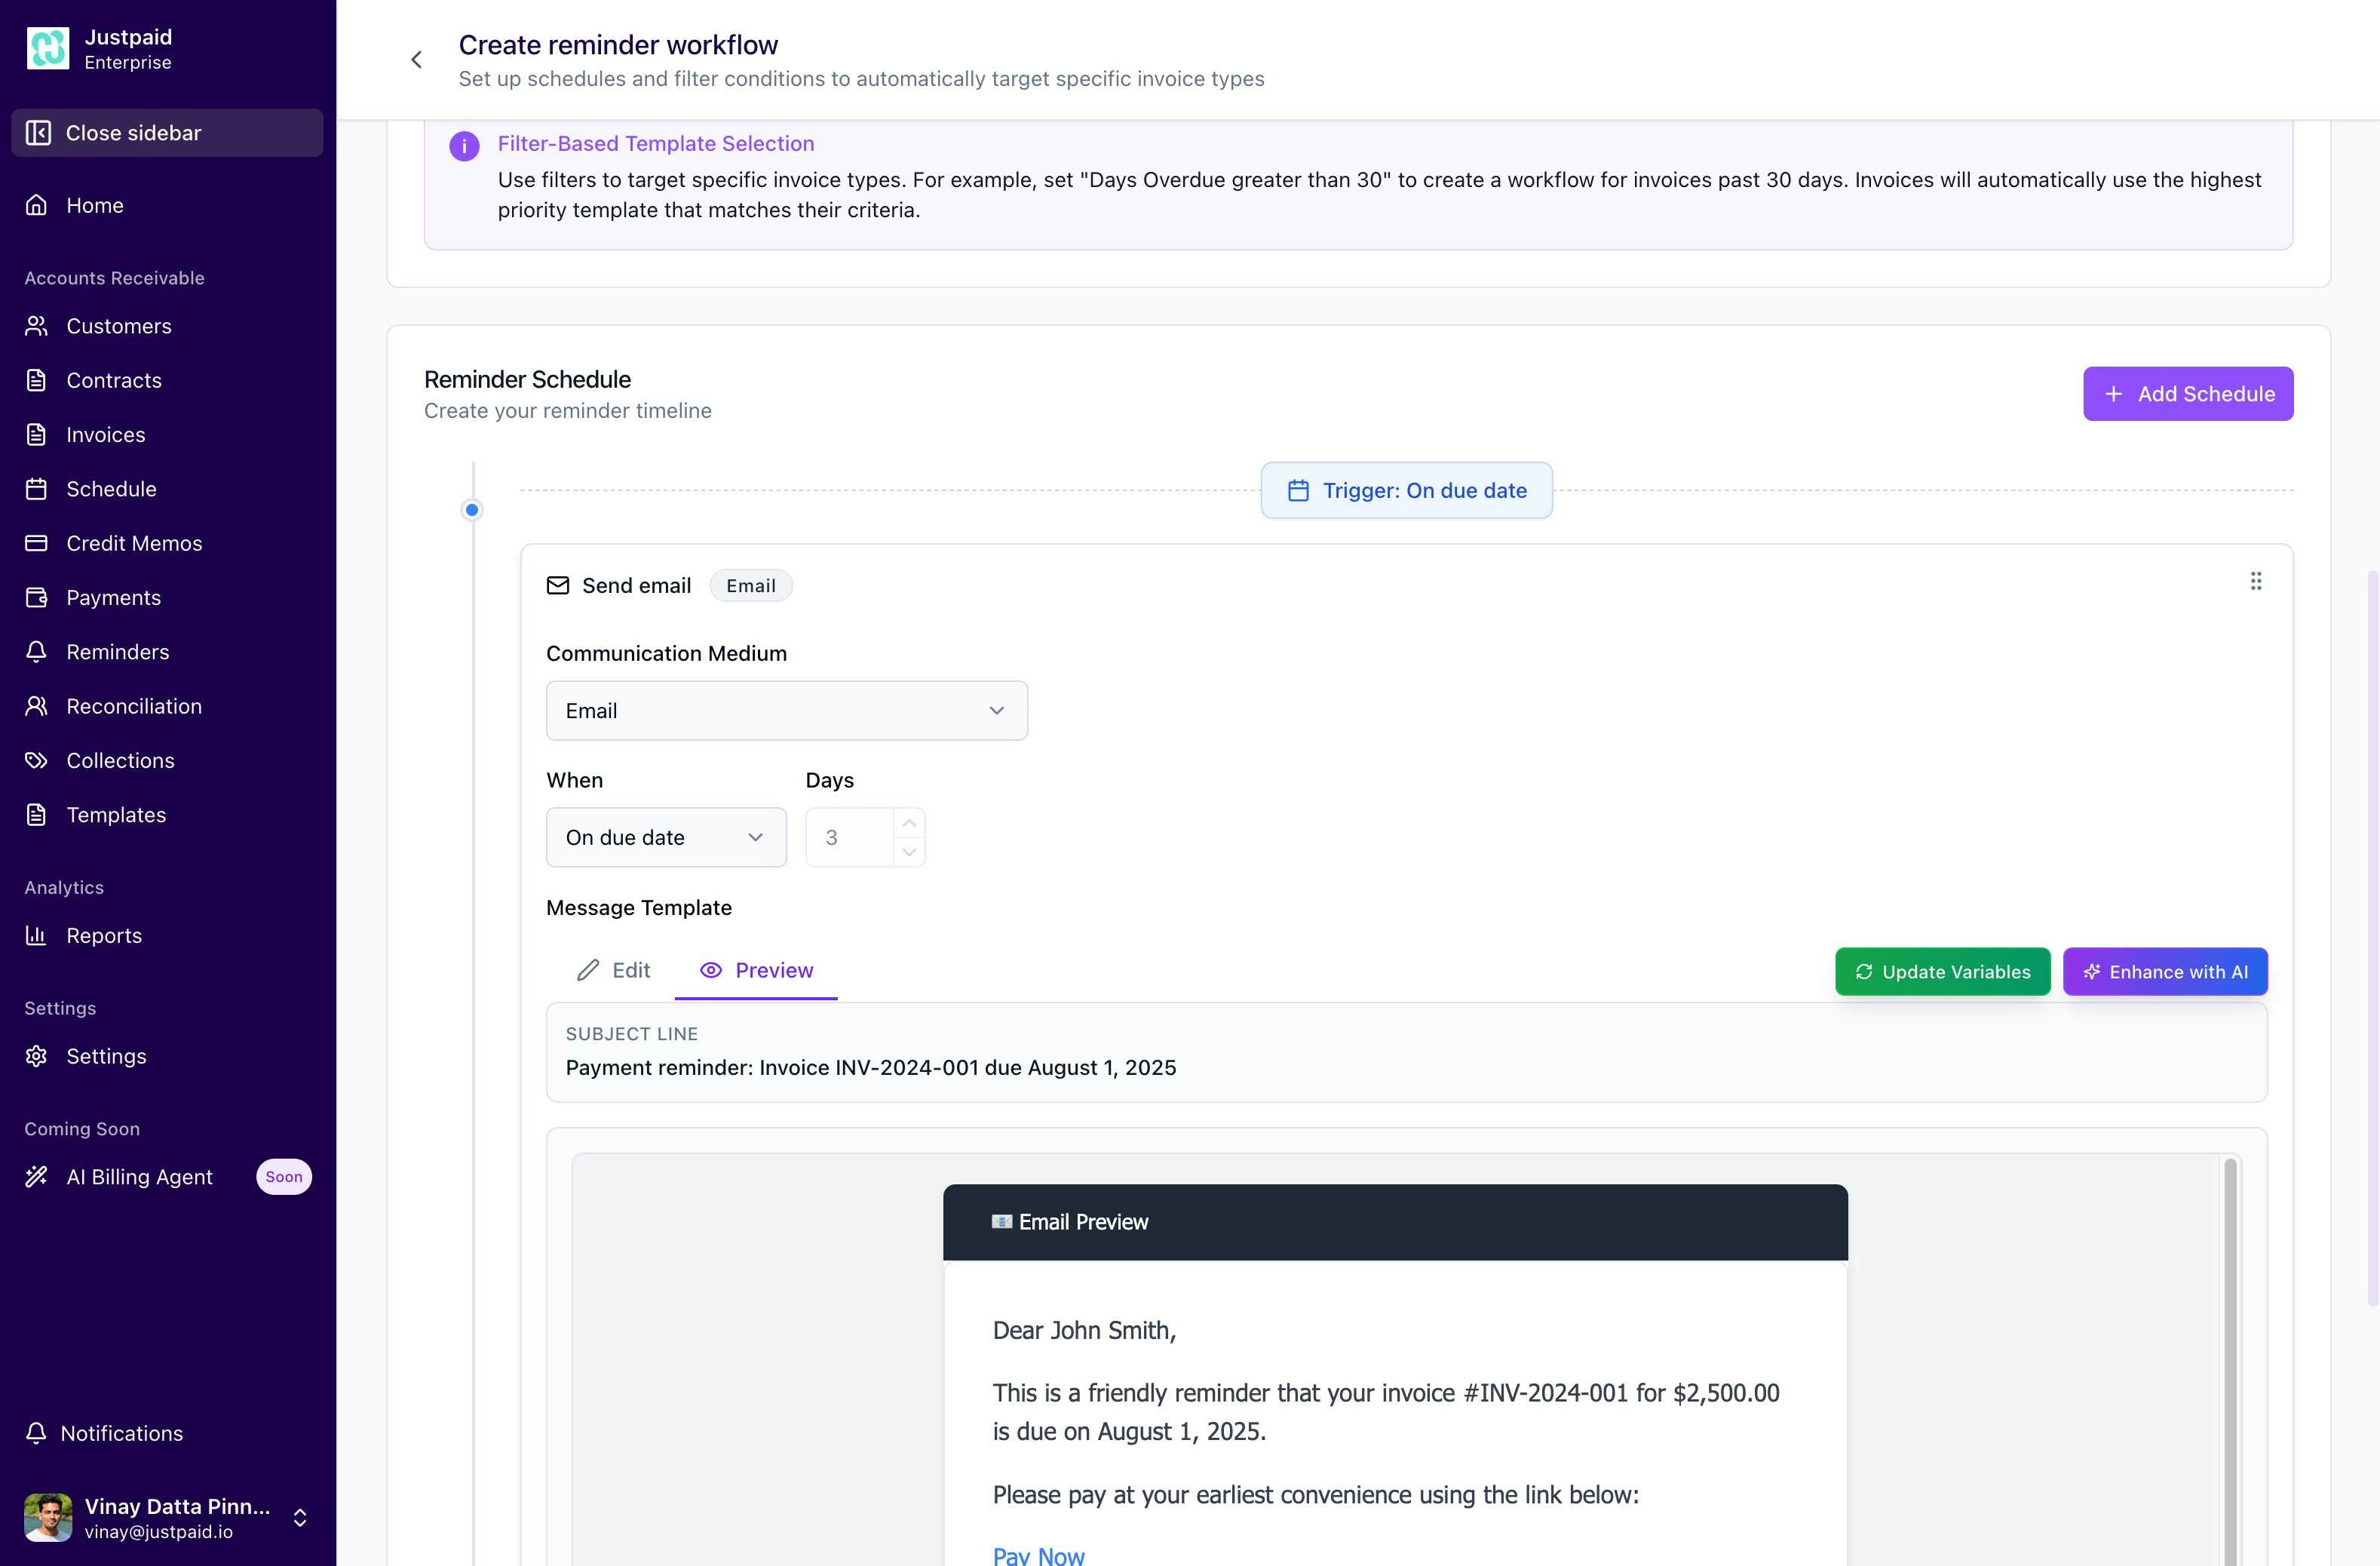
- Subject Line: How it will appear with sample data
- Email Preview: Full email rendering with:
- Sample customer and invoice data
- Formatted message content
- Payment link button
- Business signature (if configured)
Visual Examples of Schedule Configurations
Example 1: Pre-Due Date Reminder
Example 2: Email Preview with Variables
Example 3: Timing Options Selection
Managing Multiple Schedules
You can create comprehensive reminder sequences:- Add Another Schedule: Click to add additional reminder touchpoints
- Common Patterns:
- Gentle Approach: 7 days before, 3 days before, on due date
- Standard Collections: 3 days before, on due date, 3 days after, 7 days after, 14 days after
- Aggressive Collections: Daily reminders after 30 days overdue
Schedule Actions
Each schedule has three action buttons:-
Copy (duplicate icon):
- Creates an exact duplicate of the schedule
- Useful for creating similar schedules with minor variations
- Copied schedule appears immediately below the original
-
Edit (pencil icon):
- Opens the full schedule configuration interface
- Modify timing, message content, and all settings
- Changes are saved with the “Save” button
-
Delete (trash icon):
- Removes the schedule from the workflow
- Confirmation dialog prevents accidental deletion
- Cannot be undone once confirmed
Best Practices for Reminder Schedules
-
Message Tone Progression:
- Start friendly and helpful (before due date)
- Become more direct (on and shortly after due date)
- Escalate urgency (significantly overdue)
-
Timing Considerations:
- Avoid weekends for B2B customers
- Consider time zones for international customers
- Space reminders appropriately (not too frequent)
-
Content Personalization:
- Use customer name and specific invoice details
- Reference previous business relationship
- Include clear payment instructions
-
Testing Recommendations:
- Preview all messages before activating
- Test with internal accounts first
- Monitor open and click rates for optimization
Visual Guide: Building a Complete Reminder Workflow
Step 1: Initial Workflow Setup
Step 2: Configure Email Settings
Step 3: Edit Schedule Details
Step 4: Select Timing Triggers
Step 5: Preview Your Reminder
Schedule Configuration Quick Reference
Workflow Priority System
The workflow priority system determines which workflow applies when an invoice matches multiple workflow filters.How Priority Works
- Evaluation Order: Workflows are evaluated from top to bottom
- First Match Wins: Invoices use the first matching workflow
- No Further Evaluation: Once matched, lower priority workflows are ignored
Managing Priority
- Drag and Drop: Reorder workflows by dragging the grip icon (⋮⋮⋮)
- Visual Indicators: Higher position = higher priority
- Invoice Count: See how many invoices each workflow affects
Priority Best Practices
- Most Specific First: Place workflows with the most specific filters at the top
- Catch-All Last: Put broad or no-filter workflows at the bottom
- Test Changes: Monitor invoice counts after reordering
- Document Logic: Note why certain workflows have higher priority
Example Priority Structure
- Before Due Date - Customer-specific, payment failed
- 0-30 Days Overdue - Recent overdue invoices
- 30-60 Days Overdue - Moderate overdue period
- 60-90 Days Overdue - Serious overdue period
- 90+ Days Overdue - Critical collection stage
- After Due Template - General catch-all workflow
Upcoming Reminders
The Upcoming Reminders tab provides visibility into scheduled reminder activities.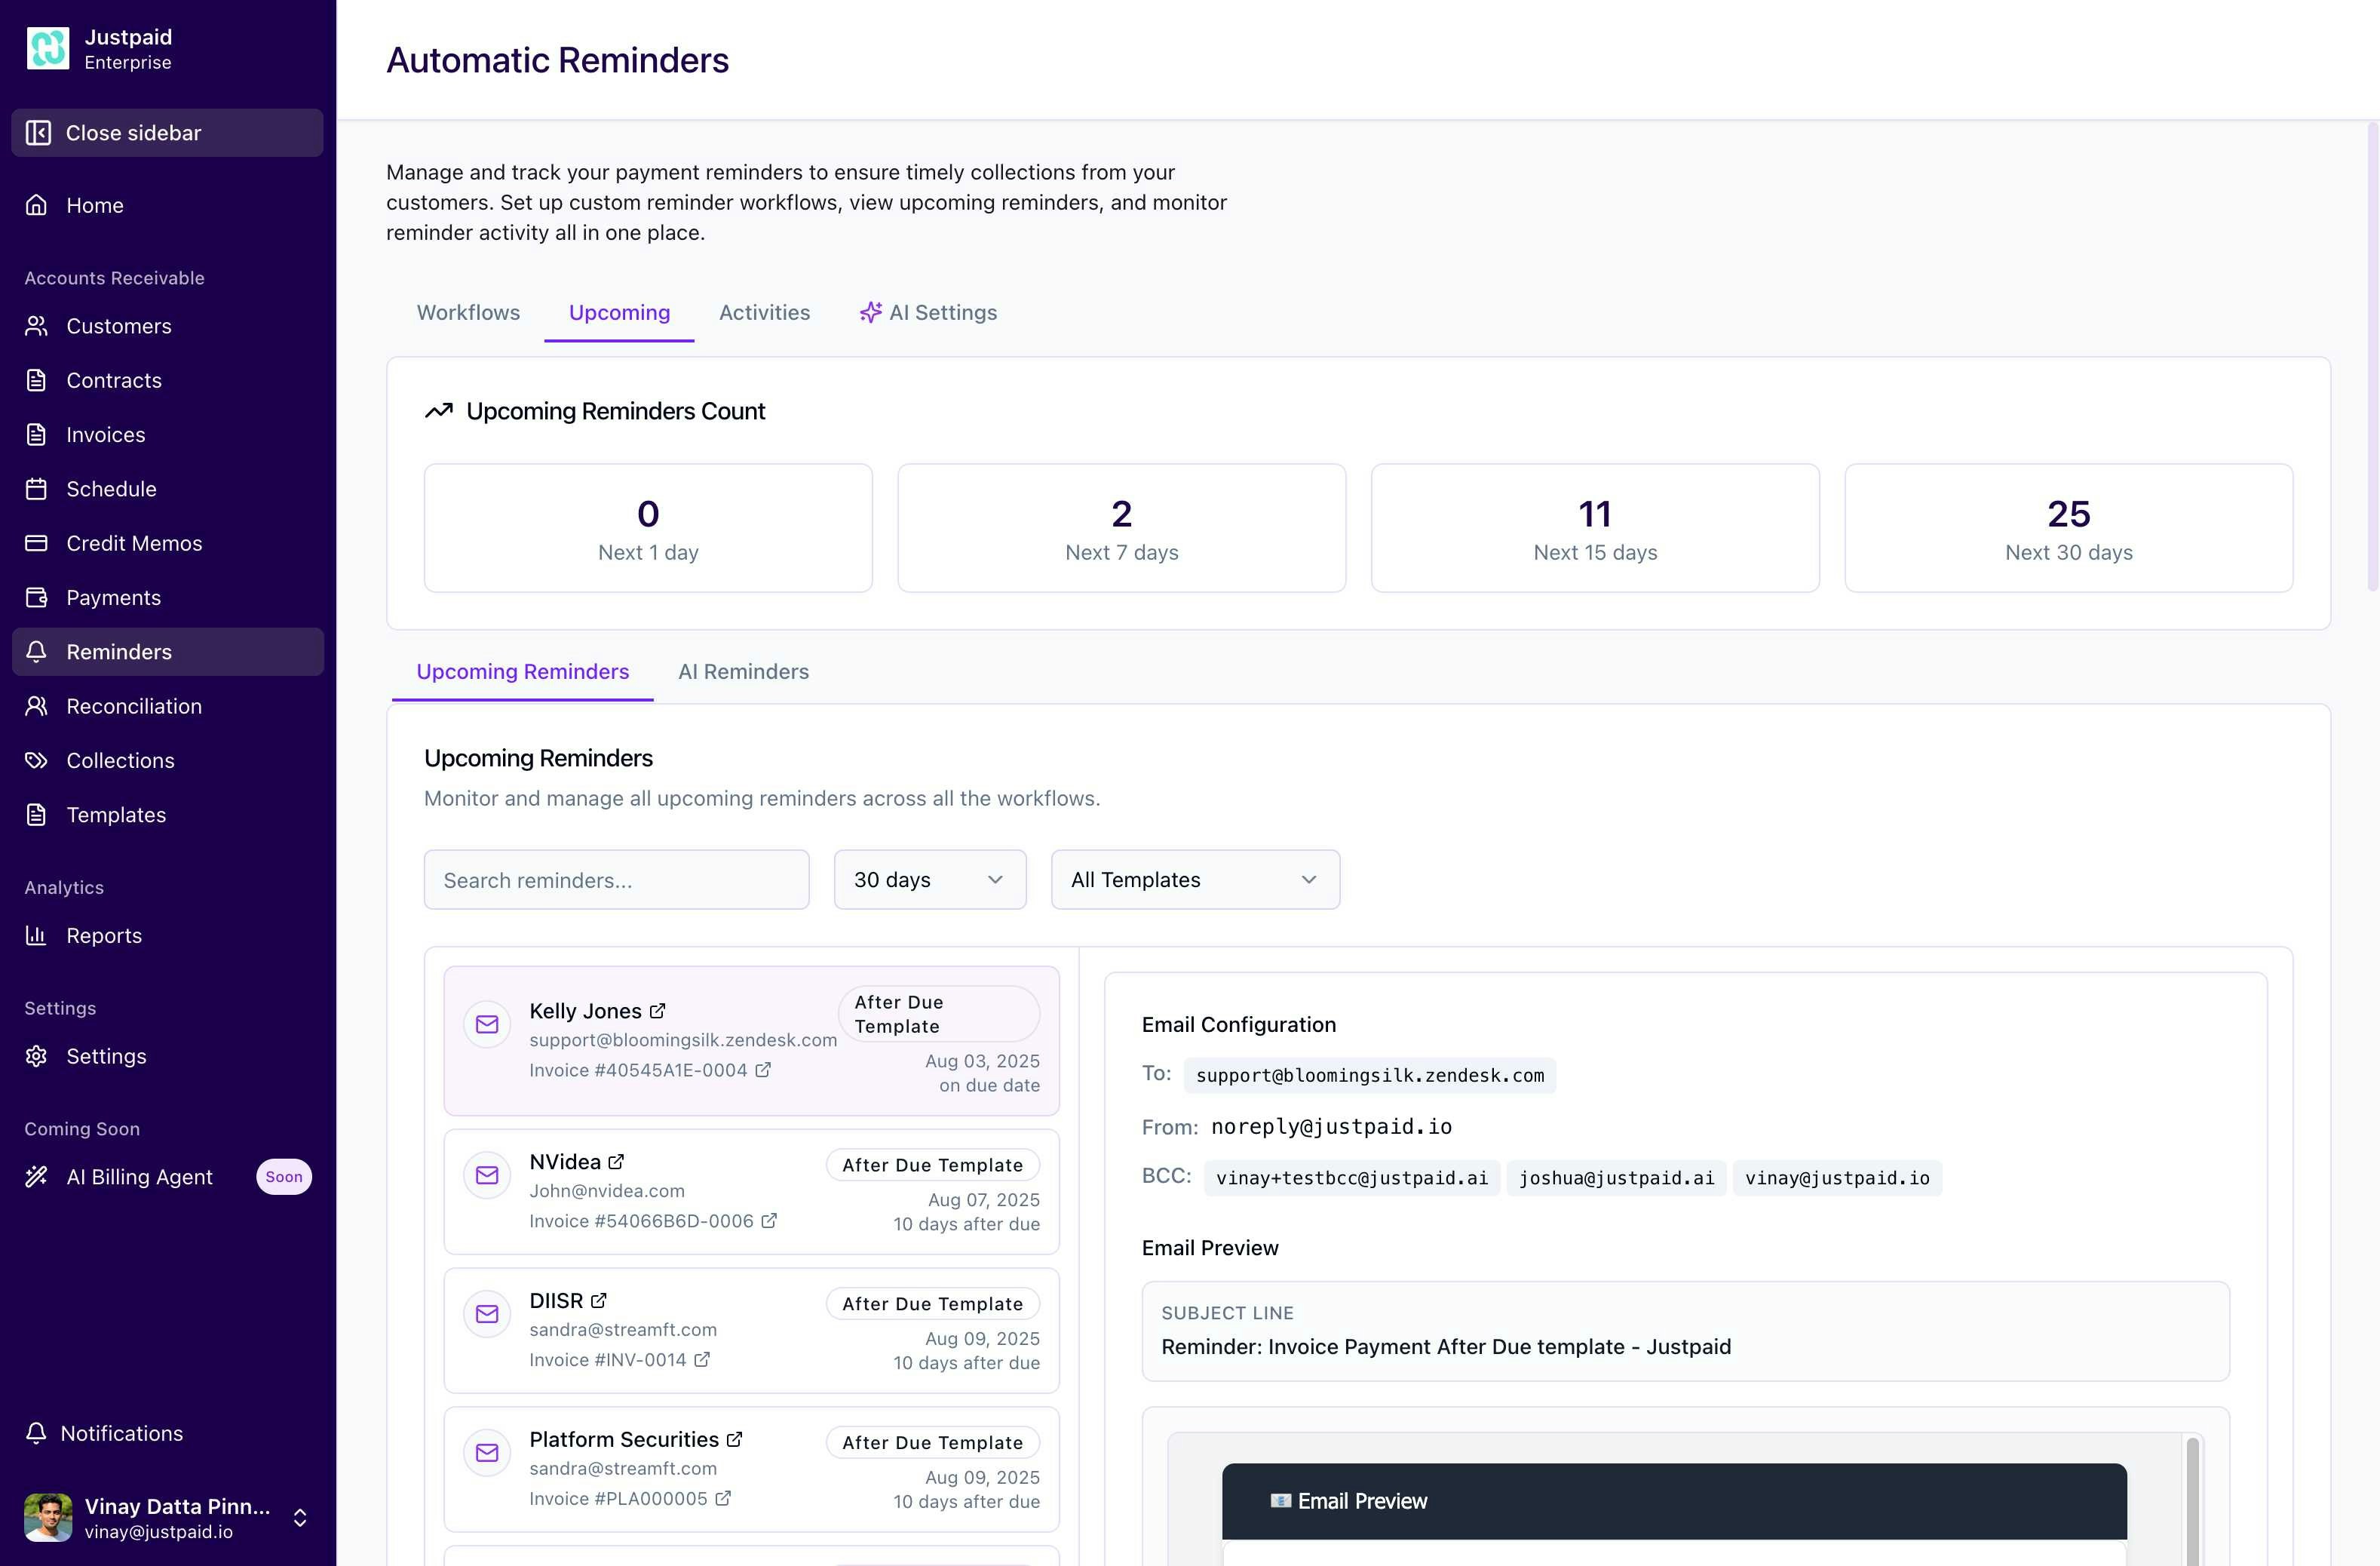
Reminder Count Overview
The dashboard displays reminder counts for different time periods:- Next 1 day: Immediate upcoming reminders
- Next 7 days: Week ahead view
- Next 15 days: Two-week forecast
- Next 30 days: Monthly overview
Viewing Upcoming Reminders
Filter Options:- Time Range: Select from 1, 7, 15, or 30 days (in the example above, 30 days is selected)
- Template Filter: View reminders from specific workflows (shows “All Templates” by default)
- Search: Find reminders by customer or invoice number
Reminder List View
The left panel shows all scheduled reminders with:- Customer name and contact email
- Invoice number with quick preview link
- Workflow template being used (e.g., “After Due template”)
- Scheduled send date and trigger timing (e.g., “on due date”, “10 days after due”)
Email Preview Details
When you select a reminder from the list, the right panel displays comprehensive preview information:Email Configuration Section
Shows the complete email setup:- To: Recipient email address
- From: Sender email address using the company’s domain (e.g., username@company.domain)
- BCC: Any blind carbon copy recipients configured in the workflow
Email Preview Section
Displays exactly how the email will appear to the recipient:- Subject Line: The complete email subject with merged variables
- Email Content: Full HTML preview of the email body including:
- Personalized greeting with customer name
- Invoice details (number, amount due, dates)
- Payment link button
- Company signature if configured
- Professional closing with business contact information
AI Reminders Tab
- Separate view for AI-enhanced reminders
- Shows personalized reminder content
- Tracks AI optimization performance
Activities & Tracking
The Activities tab provides comprehensive tracking of all reminder email activities.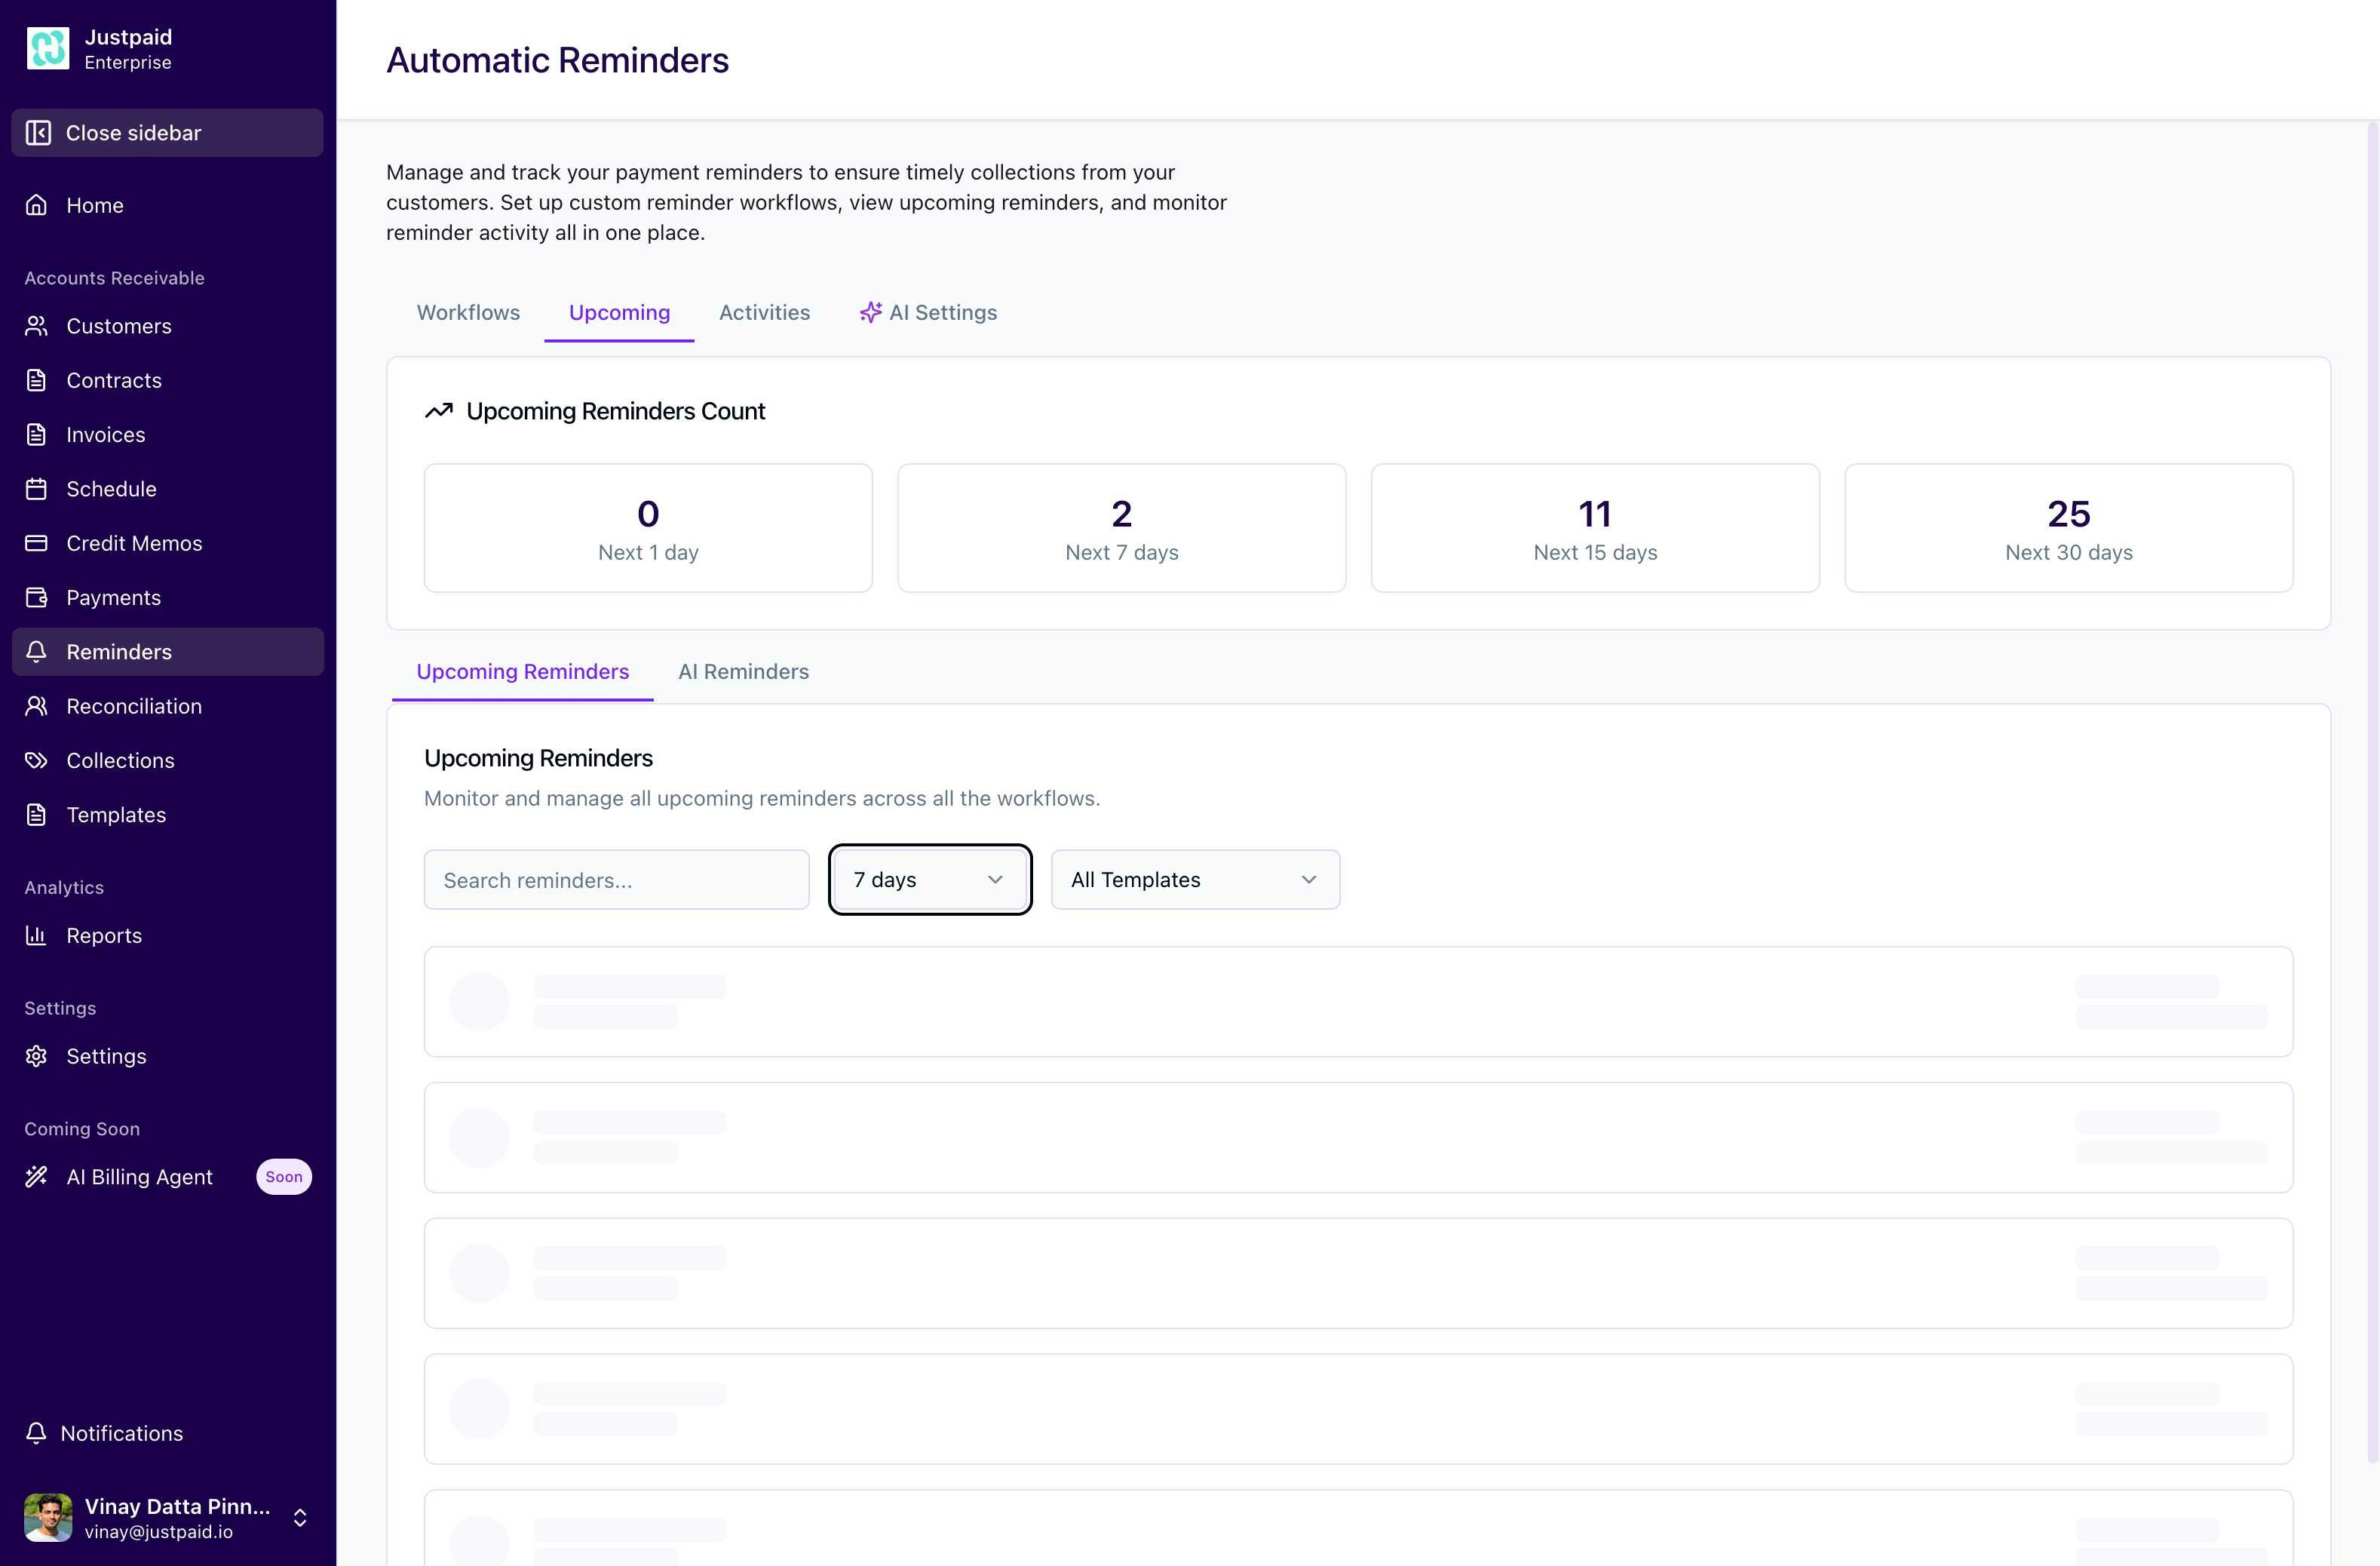
Email Activity Summary
Real-time metrics dashboard showing:-
Volume Metrics
- Emails Sent: Total reminders dispatched
- Emails Opened: Customer engagement tracking
- Links Clicked: Action taken on reminders
- Emails Bounced: Delivery failures
-
Performance Rates
- Open Rate: Percentage of emails opened
- Click Rate: Percentage with link clicks
Activity Tracking Features
Date Range Selection- Default: Last 30 days
- Custom date range picker available
- Historical data retention
- Search by customer name or email
- Filter by event type (sent, opened, clicked, bounced)
- Export capabilities for reporting
Activity Timeline
When activities are present, the timeline shows:- Timestamp of each event
- Customer and invoice details
- Event type with visual indicators
- Email subject and preview
- Detailed interaction data
Using Activity Data
- Optimize Send Times: Identify when customers engage most
- Improve Templates: Test different content approaches
- Customer Insights: Understand payment behavior patterns
- Workflow Refinement: Adjust triggers based on effectiveness
Best Practices
Workflow Design
- Start Simple: Begin with basic workflows and add complexity gradually
- Test Thoroughly: Use test customers before broad deployment
- Monitor Performance: Review activity data weekly
- Iterate Based on Data: Refine triggers and content based on results
Email Content
- Professional Tone: Maintain courteous, professional communication
- Clear Call-to-Action: Make payment options obvious
- Personalization: Use customer and invoice variables
- Mobile-Friendly: Ensure emails display well on all devices
Compliance and Ethics
- Frequency Limits: Avoid overwhelming customers with too many reminders
- Grace Periods: Consider business relationships in timing
- Escalation Path: Plan for non-responsive scenarios
- Documentation: Keep records of all communications
Troubleshooting
Common Issues
No Reminders Sending- Check workflow is enabled (toggle switch on)
- Verify filter conditions aren’t too restrictive
- Ensure email configuration is complete
- Confirm invoices match workflow criteria
- Review email content and subject lines
- Test different send times
- Verify email deliverability
- Check for spam folder placement
- Audit filter conditions
- Review workflow priority order
- Verify customer email addresses
- Check CC/BCC configurations